Last weekend Alex created the best tasting fish marinade I think I've ever had. I'm totally not exaggerating. It was really just a spur of the moment thing and since we were just making a quick fish meal, I didn't even take a picture! I wasn't expecting to blog about this simple dinner but it turned out to be so fantastic I just have to share it.
This marinade is soy sauce based and would work great on most white fishes. We were having rockfish the other night because it happened to be on sale at Whole Foods. As I've mentioned before, we love buying our meat and fish at Whole Foods- but you can't always spring for the $25 per/lb sea bass, you know? I think tilapia or mahi mahi (two other inexpensive fishes) would also work out great as would cod, or that amazing sea bass.
The fish cooked up super quick in a hot pan with a little of the marinade and we just removed the fish and sauteed up a little bok choy in that same pan. Bok choy cooks in just minutes so it was ready to go way before the fish got cold. A 20 minute dinner, if that. But SO delicious. And healthy even!
Asian Fish Marinade- by Mr. Pears
(for approx 1 lb of fish)
4 tablespoons low-sodium soy sauce
2 tablespoons honey
1 teaspoon sesame oil
Mix the (3!) ingredients together in a small glass bowl or in a small saucepan. You can either microwave the bowl for about a minute, or bring it to a boil in the pan. Allow it to cool before pouring it into a zip-lock type bag with your fish. Let it marinate in the refrigerator for about an hour before cooking.
Cook fish in a hot pan with a little of the marinade. (Cook time will vary- but for a one inch thick piece, cook for about 4 to 5 minutes on one side then 2 to 3 minutes longer after you flip.)
And sorry again about the lack of picture. I just wasn't expecting to blog about my quickie rockfish/bok choy dinner! Maybe I should have taken a picture of my practically licked clean plate. :P

Showing posts with label dinner. Show all posts
Showing posts with label dinner. Show all posts
Wednesday, February 1, 2012

Wednesday, January 11, 2012
Minestrone Soup
Now that the holidays are over and things have settled down, I feel like we are back to our normal eating/cooking routine. We are back to cooking a lot on the weekends and making/freezing foods for the kids. Even though I'm at home all day, I like having simple dinners during the week. Not only is it less stressful but it also seems to be healthier for us. Our quick meals during the week are often lighter than the food we indulge in on the weekends.
This weekend I made a minestrone soup. Mr Pears didn't seem all that thrilled with the prospect of what we called, "a bland soup", but he...umm...ate his words, lol! This soup is super healthy and packed with a ton of great veggies and beans and a ton of flavor. It does use a few slices of bacon so it is not a typical vegetarian minestrone, but it could be...and I think it would be just as good. I just served it with some garlic french bread, and it was a great meal.
This is definitely a weekend recipe, though, in my opinion. There is lots of chopping to do. But the work does pay off and the recipe made enough soup for us to freeze two batches for later.
So if cutting calories was on your list of resolutions...or if you just want a nice light dinner next week, give this one a try. :)

Minestrone Soup, adapted from Bobby Flay
3 tablespoons extra virgin olive oil
1 large red onion, chopped
2-3 stalks of celery, chopped
2-3 large carrots, chopped
4 cloves garlic, chopped
2 slices bacon, chopped
1/2 head of cabbage, sliced thin, and steamed for 2-3 minutes
1/2 bunch kale, destemmed and chopped
4 cups chicken stock
1 can diced tomatoes, drained
1 bouquet garni (1 sprig rosemary, 4 sprigs thyme, 1 bay leaf, tied with kitchen string)
2 cans cannellini beans
salt, pepper, and freshly grated Parmesan cheese
Heat the oil in a large soup pot over medium-high heat and then add the onion, celery, carrots, garlic, and bacon and cook for about 5 minutes while stirring. Add in 4 cups of water along with the stock, cabbage, kale, tomatoes, and bouquet garni. Bring the soup to a boil then turn down the heat and let it simmer together for about 30 minutes.
In the meantime, puree one can of beans in your food processor or blender. After 30 minutes of simmering add the puree and the other can of beans (drained) to the soup, stir it together and let it all cook 10 minutes longer. Taste the soup and season it with salt and pepper.
When you serve the soup sprinkle each portion with some Parmesan cheese. Enjoy!
This weekend I made a minestrone soup. Mr Pears didn't seem all that thrilled with the prospect of what we called, "a bland soup", but he...umm...ate his words, lol! This soup is super healthy and packed with a ton of great veggies and beans and a ton of flavor. It does use a few slices of bacon so it is not a typical vegetarian minestrone, but it could be...and I think it would be just as good. I just served it with some garlic french bread, and it was a great meal.
This is definitely a weekend recipe, though, in my opinion. There is lots of chopping to do. But the work does pay off and the recipe made enough soup for us to freeze two batches for later.
So if cutting calories was on your list of resolutions...or if you just want a nice light dinner next week, give this one a try. :)
photo from foodnetwork.com, my darn phone isn't uploading!
3 tablespoons extra virgin olive oil
1 large red onion, chopped
2-3 stalks of celery, chopped
2-3 large carrots, chopped
4 cloves garlic, chopped
2 slices bacon, chopped
1/2 head of cabbage, sliced thin, and steamed for 2-3 minutes
1/2 bunch kale, destemmed and chopped
4 cups chicken stock
1 can diced tomatoes, drained
1 bouquet garni (1 sprig rosemary, 4 sprigs thyme, 1 bay leaf, tied with kitchen string)
2 cans cannellini beans
salt, pepper, and freshly grated Parmesan cheese
Heat the oil in a large soup pot over medium-high heat and then add the onion, celery, carrots, garlic, and bacon and cook for about 5 minutes while stirring. Add in 4 cups of water along with the stock, cabbage, kale, tomatoes, and bouquet garni. Bring the soup to a boil then turn down the heat and let it simmer together for about 30 minutes.
In the meantime, puree one can of beans in your food processor or blender. After 30 minutes of simmering add the puree and the other can of beans (drained) to the soup, stir it together and let it all cook 10 minutes longer. Taste the soup and season it with salt and pepper.
When you serve the soup sprinkle each portion with some Parmesan cheese. Enjoy!
Friday, January 6, 2012
Moroccan Eggplant
Yesterday I did something wild and crazy....I made myself lunch. Might not seem that crazy to you but it is a rare occurrence around here. Most days I don't eat lunch. I've discussed this before...you can read about it on the only other lunch post I've done, back in August, which was probably the last time I made myself lunch.
Anyway, I know I should eat lunch more often and since we had an extra eggplant left over from the yummy eggplant parm we made the other night, I decided to revive an old favorite of mine, Moroccan Eggplant. It is super easy to make but it does take about an hour since the eggplant has to roast for 40 minutes. It's not a labor intensive dish though, and I actually did something else wild and crazy while it was roasting. I cleaned out my spice cabinet. Woo Hoo.
For anyone who is interested in some house organizing/decluttering motivation, check out this calendar from My Simpler Life. The calendar is free to download and each day you have just one item to declutter. I'm loving it so far! And Jan 5, 2012 was the day to clean out the garlic salt that expired in 2004. No lie. Plus I didn't even live in this house in 2004! (Mr Pears owned the house before we met).
Ok back to the recipe....it's good. It is easy to reheat throughout the week and it is healthy. I hope you like it.
Moroccan Eggplant, adapted from....I don't know! I've been making this awhile and I've no idea where I found the recipe....sorry! If it's yours let me know and I'll give credit where credit is due.
(makes three lunches, double the recipe to serve four for dinner)
1 medium sized eggplant
1 can diced tomatoes
2 tablespoons olive oil
2 teaspoons smoke paprika
1 teaspoon cumin
1 teaspoon crushed garlic
a pinch of cayenne pepper
salt and pepper
Serve over couscous
Start by spraying a large pot or dutch oven with vegetable oil cooking spray and heating it on medium for about 5 minutes. Prick your eggplant all over with a fork and then put it into your hot pan and cover it.

Let it roast for 20 minutes, turn it over, then let it roast another 20 minutes. When it is cool enough to handle, slice off the top stem, slice the eggplant lengthwise and then put it face down in a colander to drain for about 10 minutes.

Once drained and cool, scoop out the flesh and put it into a saucepan. Mash it up with a wooden spoon.

Turn the heat on to medium low and add the remaining ingredients, stirring to combine. Heat all the way through, about 10 minutes.
While the eggplant is heating, make your couscous. I make mine by heating 1 cup of water in the microwave until boiling (about 1min30sec) then pouring it over 1/2 cup couscous in my serving bowl. I just stir it together and put a small plate on top for 5 minutes. Fluff, drizzle some olive oil and voila!

Top the couscous with the eggplant and enjoy! This is easy to reheat and keeps well in the refrigerator for a few days. You can make the couscous fresh each day (only takes 6 minutes!) or make a bigger batch and reheat that too.

Friday, December 30, 2011
Short Rib Risotto
Hello there, ready for New Years? I can't believe Christmas is over and New Years is almost here. 2012 is almost here! And this could mark the first year that Alex and I don't make it until midnight. We are usually NYE party-ers but I guess babies do change things.
We actually are going to a party on New Year's Eve, it's just going to be a little different. We'll all be celebrating New Years on East Coast time (out here in Las Vegas) so that all the kiddos don't have to stay up so late to join in on the festivities. Kids and a 9pm celebration haven't factored in on past parties we've attended but, nevertheless, I think it is a great idea and I'm looking forward to it. In fact, I doubt we'll even make it until 9...(in fact I'm pretty sure the kids will be in bed before 8) Oh well, the Mr. and I will come home, put the kids to bed and drink some champagne from the comfort of our own couch. Good times.
If we were having dinner at home, this recipe I have to share might have been on the menu. We made it a few weeks ago and it was fabulous. It's our actually our own concoction, which is something we rarely do. We really are just recipe followers, you know. But genius did strike us when we decided to combine two of our favorites, short ribs and risotto. Creamy delicious risotto with melt in your mouth short ribs topped with a gravy from the pan juices. It was pretty easy and super super delicious. The short ribs do take about 2 and a half hours to cook but the result is always so tender, it really is worth the time.
So, whatever your plans are this New Year's, I hope you have a wonderful time and are surrounded by those you love and who love you. Best wishes for the New Year from the 4 Pears family to yours.

Short Rib Risotto, risotto adapted from Mario Batali
Short Ribs
1 1/2 pounds boneless short ribs
2 carrots, diced
1 medium onion, diced
3 cloves garlic, crushed
1 can diced tomatoes
2 quarts beef stock (+/-)
Risotto
1/4 cup extra virgin olive oil
1 medium onion, diced
4 cups chicken stock, hot
2 cups arborio rice
1/2 cup white wine
4 tablespoons unsalted butter
1/2 cup freshly grated Parmesan cheese (Parm-Reggiano is even better!)
To begin the short ribs, saute the onion, carrots and garlic with a little bit of olive oil in a large heavy saucepan. At the same time, in a non-stick pan, heat a tablespoon or two of olive oil and brown the short ribs on all sides. Once the veggies are softened, around 5 minutes of so, add the diced tomatoes and cook for another minute or two. Now place the browned short ribs into the saucepan with the veggies and pour over enough beef stock to cover the meat. Bring the pot to boil and then turn down the heat and allow the whole thing to simmer for 2 to 2 and a half hours. The meat will be falling apart when it is done.
Once it's done, remove the meat to a platter and pull it apart with a fork. Pour what is left in the pan into the blender to puree it into an awesome gravy. Pour the gravy back into the pan and put the meat back into the gravy and keep it on low as you cook your risotto.
To begin the risotto, heat the olive oil in a large saute pan until it is shimmering. Add the onions and cook for about 8 minutes. You want it to be soft and translucent but not brown. Next add the rice to your pan and toast it for about 3 minutes or until it is opaque.
Add the wine and a ladle of stock to the rice and begin the marathon of stirring. Keep stirring until the liquid is almost all absorbed then add another ladle of stock. Repeat until the rice is creamy and tender. The amount of stock you use will vary but it should take 15 to 20 minutes or so.
Remove the risotto from the heat and stir in the butter and cheese. Plate the risotto and then top each plate with portions of the short ribs and gravy. Enjoy!
Friday, December 23, 2011
Merry Christmas Menu
For me, certain holidays mean certain foods. For Thanksgiving there is obviously turkey, but Christmas is always ham. Even though Alex has been threatening(?) me with the idea of a "Festival of Liver" Christmas dinner, we will be having ham. I rarely put my foot down around here but when I do I mean business! This also applies to the pancakes with blueberry sauce we'll be having Christmas morning, even though my poor husband isn't such a huge fan of blueberries. I've been having them Christmas morning ever since I can remember and it wouldn't be Christmas without them! Memories of my Dad making blueberry pancakes or my Grandmother's mac and cheese are part of what makes the holidays special. I'm looking forward to making those memories with my own children soon.
So despite Alex's desire to do something exotic and interesting for the big holiday dinner, we'll be sticking to simple family favorites. Our Christmas dinner will be quiet this year...just us and two good friends. We'll miss having our family around us but at least we'll have a dinner that reminds us of home. I'm pretty sure even Alex will be happy with all the holiday comfort food. :)
Here's what will be on our dinner table for Christmas this year...
Alton Brown's City Ham
Homemade Baked Macaroni and Cheese
Brioche (I already got a brioche pan for Christmas, now I just need a recipe!)
Pumpkin Pie with Maple Whipped Cream**
**this could be the best whipped cream on the planet, just add 1 tablespoon of good maple syrup to a cup of cream and mix until fluffy**
Have a Merry Christmas or a joyful holiday of another sort. Enjoy your family, friends, and of course, dinner. ;)
Wednesday, December 14, 2011
Leftover Pot Pie
There are always tons of leftovers at the holidays and you need a solid recipe to use some of them up....this is it! Last Christmas we made an amazing prime rib but since Mr Pears sometimes overdoes things, like buying 10 plus pounds of prime rib for 6 people, we had some leftovers. We decided to make this pot pie by Jamie Oliver and it was unbelievably good, we swore to make it again soon. Fast forward to last weekends' 15 pound turkey....more leftovers. Thankfully we remembered this recipe, it was pretty darn awesome with turkey too. Thank God because I have so much turkey over here that I made two of the pot pies and I'm going to do a turkey chili tomorrow. Stocking up the freezer with week day meals!
Anyway. This pot pie is really good and it works with just about any leftover meat you might have. Certainly chicken, beef, turkey, or even ham. It is easy to make and it does make an awesome alternative to eating boring leftovers. The pie has a flaky puff pastry crust and is stuffed with leeks. Since leeks might not be something you use often (or ever), I'll say they have a very mild oniony flavor and a nice sweetness. Make sure to wash them very well because they tend to be quite sandy. Enjoy!

"Leftover" Pot Pie, adapted from Jamie Oliver
2 slices of bacon, chopped
1 table fresh thyme leaves
1 tablespoon olive oil
3 tablespoons butter
4 lbs of leeks, washed, trimmed and sliced (trim off the dark green tops and just slice the white and light green parts)
1 1/2 lbs of leftover turkey/beef/chicken/ham, cut into bite-sized pieces
2 tablespoons all-purpose flour
1 tablespoon Cajun seasoning
4 cups chicken or vegetable stock
2 tablespoons of creme fraiche (you can also substitute Mexican crema, which I use, or sour cream)
1 sheet of store bought Puff Pastry, thawed
1 egg, beaten
In a very large saute pan or dutch oven over medium heat; cook the bacon with the thyme, olive oil and butter for about 5 minutes. Add the leeks and cook them for a few minutes, just let them begin to wilt and turn them to coat well. Cover the pan with a lid and allow the leeks to cook for about 30 minutes or until nice and soft. Stir the leeks every ten minutes or so to make sure they don't stick to the pan or burn.
Once the leeks are done add the meat, seasoning and flour and stir it all together. Stir in the stock and then the creme fraiche. Bring the pot to a boil and let it simmer for five minutes. Now place a large strainer over a bowl and pour the whole mixuture into it. Reserve the amazing gravy left in the bowl for serving and put the strained pie filling into a baking dish.
Roll out the puff pastry to fit the top of the baking dish and then lay it over the dish. Tuck the edges under to make it fit. Now score the top of the pie diagonally with the tip of a sharp knife and brush it with the beaten egg.
Bake the pie in an oven that has been preheated to 375 F for about 35 to 40 minutes or until the pie is golden brown and puffy. Serve with the warmed gravy!
The whole pie, yum.

Wednesday, November 9, 2011
Who Needs Potatoes Anyway?
Not this girl. I have found a new "mashed potato", and I am in love. A long while ago I attempted to make a celery root puree for my Mom and her fiance when they were visiting. It didn't come out that great but I could see the potential and I really wanted to try it again. Lo and Behold, Ina Garten (who is probably my go-to for solid recipes) had a recipe for Celery Root and Apple Puree. I tried it last week and I swear it is so good that I may never make mashed potatoes again.
This recipe is perfect for Thanksgiving, which is just around the corner (time flies). Creamy and delicious with a little sweetness and tang from the apples and cider. This is some seriously great stuff and best of all? It is different. A little twist on a classic mashed potato that is sure to set your Thanksgiving spread apart from the others. I hope you love it.
Celery Root and Apple Puree, adapted from Ina Garten
1/2 cup unsalted butter (1 stick)
1 cup large-dice fennel bulb (remove tops and core and cut into large chunks!)
2 lbs celery root (slice off the dark brown outer surface) large-dice
8 ounces of Yukon Gold potatoes (1 or 2 potatoes), peeled and large-dice
3 Golden Delicious apples, peeled and cored, large-dice
1/2 cup apple cider
1/4 cup heavy cream
Looks like a lot of chopping, peeling and dicing huh? It really isn't too bad. Just make sure to cut all the veggies into pieces about the same size...3/4 inch to an inch...so they cook evenly. Melt the butter in a large pan (I like to use my dutch oven) and then add the veggies and fruit to the pan along with the salt and pepper. Saute the veggies for about 5 minutes before adding the cider and then bringing everything to a simmer. Allow the pot to simmer, covered, for about 30 to 40 minutes. Stir occasionally and make sure everything is very soft when done. Add some more cider if it starts to dry out. After everything is cooked stir in the cream.
Turn off the heat and let it cool a bit before transferring the contents of the pan to the food processor. Pulse until coarsely pureed. Serve warm.
PS. Sorry about the lack of picture! I had one, I swear. Can't find it now, though, darn it. Picture mashed potatoes....they look very similar...they just taste better! :)
Monday, November 7, 2011
Lobster Bisque
I may be one of the only people in the world who isn't all in love with lobster. I've had it every which way you can imagine, including raw, and I'm just not the biggest fan. This soup, however, is awesome.
This lobster bisque could be the easiest soup I've ever made. Since you buy the lobster already cooked from the grocery store, you are literally just making a quick cream based soup and heating it for a few minutes. With this recipe you can have a homemade seafood soup in about 30 minutes. Hard to beat that. The Old Bay and cayenne pepper give it a bit of kick and a lot of flavor for a soup with only ten ingredients...or any soup for that matter. Try this for a delicious and heart-warming lunch or dinner one of these chilly fall days.

Lobster Bisque, adapted from Wilma Scott
1 cup vegetable stock (or chicken stock)
1 medium onion, diced
3 tablespoons butter
3 tablespoons all-purpose flour
2 cups milk
1/2 teaspoon salt
1 tablespoon Worcestershire sauce
2 tablespoons tomato paste
1/2 teaspoon Old Bay seasoning
1/4 teaspoon cayenne pepper
1 pound lobster tail, cooked and roughly chopped
Put both the onion and the stock in a small pan and bring to a boil, lower the heat and allow it to simmer for about 5 minutes. Meanwhile, in a medium size pot, melt the butter and whisk in the flour. Cook the flour about 3 minutes whisking constantly. Now slowly pour in the stock and onions while continuing to whisk. Whisk in the milk and then the spices and tomato paste. Stop to taste the soup now and adjust the seasoning to your liking. Stir in the lobster then allow the soup to simmer for about 15 minutes or so. Be careful not to let it burn. Serve and enjoy!
Wednesday, November 2, 2011
A New Way to Do Chicken
My 13 month old(!) boys are pretty much eating everything these days. I'm happy to say that they aren't picky eaters and are willing to try just about anything. Their lack of molars doesn't get in the way of their enjoyment of most foods either. Meat, however, can sometimes be an issue. At this point they can really only handle either ground or shredded meat so I'm always on the lookout for new and interesting ideas. Chicken, in particular, is something they don't eat a lot of. They love roasted chicken, but rarely eat it any other way. (They haven't yet had chicken nuggets!)
These Indian Spiced Chicken Burgers are a new favorite. Now I know these might not sound all that appealing to some people right off the bat. I, for one, prefer beef in my burgers. BUT! Ground patties, be they turkey or veggies are easy for little fingers to pick up and for toothless gums to mash up. And don't be worried about feeding thebaby toddler "Indian" spices. In this recipe the ground chicken is seasoned with Garam Masala. Garam Masala is a popular Indian spice, but it is really just a combination of spices that are commonly used in the U.S. too. Typically it is a mix of cinnamon, cloves, nutmeg, cardamom, cumin, coriander, and pepper. Garam Masala is a warm spice full of fall flavors.
These "burgers" are easy to make, easy to freeze, and they are sure to be a hit with your little ones. Or your big ones. My husband and I like these too! And they are only 364 calories per serving...Cooking Light is awesome sometimes. :)

Indian-Spiced Chicken Burgers, adapted from Cooking Light
1/4 cup green onions, sliced
1 tablespoon lemon juice
2 teaspoons garam masala
1 teaspoon bottled fresh minced ginger
1/4 teaspoon salt
1 pound ground chicken
Combine all ingredients in a medium bowl. Form into patties. Simple, right? The recipe (and calorie count) is for four burgers but I make smaller ones for the kiddos. Heat a large skillet coated in cooking spray and then cook the patties over medium high until done all the way through. That will take about 7 minutes per side for full sized burgers, a bit less time for smaller ones.
Try serving them on good rolls using yogurt in place of mayo and some fresh spinach instead of lettuce! Look at us being so healthy! Not such a bad idea after all of the Halloween candy, huh?
These Indian Spiced Chicken Burgers are a new favorite. Now I know these might not sound all that appealing to some people right off the bat. I, for one, prefer beef in my burgers. BUT! Ground patties, be they turkey or veggies are easy for little fingers to pick up and for toothless gums to mash up. And don't be worried about feeding the
These "burgers" are easy to make, easy to freeze, and they are sure to be a hit with your little ones. Or your big ones. My husband and I like these too! And they are only 364 calories per serving...Cooking Light is awesome sometimes. :)
photo courtesy of Cooking Light, don't mind the beer in the pic, pretend it is apple juice!
Indian-Spiced Chicken Burgers, adapted from Cooking Light
1/4 cup green onions, sliced
1 tablespoon lemon juice
2 teaspoons garam masala
1 teaspoon bottled fresh minced ginger
1/4 teaspoon salt
1 pound ground chicken
Combine all ingredients in a medium bowl. Form into patties. Simple, right? The recipe (and calorie count) is for four burgers but I make smaller ones for the kiddos. Heat a large skillet coated in cooking spray and then cook the patties over medium high until done all the way through. That will take about 7 minutes per side for full sized burgers, a bit less time for smaller ones.
Try serving them on good rolls using yogurt in place of mayo and some fresh spinach instead of lettuce! Look at us being so healthy! Not such a bad idea after all of the Halloween candy, huh?
Thursday, October 20, 2011
Currywurst - German Street Food!
One of my favorite parts of traveling to other countries is eating street food. In London there are the most amazing curry stands and of course the fish and chips wrapped in newsprint. In Paris it is all about crepes. My favorite are the crepes au thon (swiss cheese and tuna, yum!).
So even though I haven't yet been to Germany I was excited to make some German street food for our Oktoberfest extravaganza. Currywurst is sausages cut into slices and served with a curry sauce and either fries or Brotchen (a roll). We decided to serve ours with pretzel rolls instead since we both love them and have wanted to try them out for a while. (Pretzel Roll recipe tomorrow!)
I liked the currywurst! It was simple pub-type fare but it was good with some sauerkraut and some beer. We enjoyed them and had a nice relaxing Friday night. :)

Currywurst, adapted from JenFen on All Recipes
1 pound bratwurst or other pork sausage
1 (15 oz) can of tomato sauce
2 tablespoons chili sauce (we used Heinz)
1/4 teaspoon onion powder
1/4 teaspoon salt
1 tablespoon white sugar
1 teaspoon ground black pepper
1/4 teaspoon paprika
2 teaspoons curry powder
Cook sausages on the grill or a grill pan. Set aside.
In a small saucepan over medium heat combine the tomato sauce with all the rest of the ingredients. Bring to a gentle boil and then allow the sauce to simmer for 5 minutes or so.
Slice the sausages and then pour over some sauce and enjoy them!
Wednesday, October 19, 2011
Weiner Schnitzel
I honestly didn't think I'd have, not one, but two "schnitzel" recipes on my blog. But in our decision on what to make to celebrate Oktoberfest this year Alex and I decided to try Wiener Schnitzel since I have never in my life eaten veal.
Wiener Schnitzel is basically a thin piece of veal, lightly breaded and fried. The thought of poor little baby cows has made me pass on veal for many years but we decided we would get some humanely raised veal from Whole Foods and give it a shot. I highly recommend buying meat at Whole Foods for that reason along with a host of others. It can be pricey but if you can afford it, it is worth the extra cost. If you want to pass on the veal though, feel free to substitute pork loin instead. Just slice the pork into medallions and pound them thin. Less guilt, lower cost. Still delicious.

Wiener Schnitzel, adapted from Paula Deen
4 veal cutlets (about 4 oz each, pounded thin)
salt and pepper
1 cup all-purpose flour
2 eggs, beaten
2 tablespoons water
2 cups plain dry breadcrumbs
vegetable oil for frying
1 lemon, cut in wedges
This recipe takes only about 10 minutes start to finish so make sure your sides are ready to go. (We served pan-roasted carrots and parsnips with some braised red cabbage with our schnitzel.)
First get your breading stations ready. Put the flour in one shallow dish, the beaten eggs and water in a second, and the breadcrumbs in the third. Now pat dry the veal and salt and pepper them on each side.
Fill a large skillet with an inch or so of vegetable oil and place it over medium-high heat. Now you can dredge your veal in the flour, then the egg wash, and lastly the breadcrumbs. Once the oil is hot put the veal in the pan. Depending on the size of your veal and pan you may need to do these in two batches. Fry the veal for 2 minutes per side then remove them to a plate lined with paper towels. Sprinkle them with a bit of salt.
Make sure to give each person a lemon wedge or two for them to squeeze over the schnitzel before that first bite. The lemon adds a nice crisp flavor to the schnitzel. Enjoy!
Tuesday, October 18, 2011
How-To Tuesday! Spatzle
How-To Tuesday German Style! For those of you who have never even heard of spatzle....spatzle is basically a German egg noodle. It's a short little noodle that is generally made of eggs and flour, it's very easy to make and very yummy to eat. Another good reason to make your own? Buying boxed spatzle is actually kind of pricey here in the U.S.
Quick and easy directions for the spatzle, then a great recipe to use it in to follow. :)
Spatzle, adapted from Gordon Ramsay (serves 2)
1 cup all-purpose flour
1 tsp salt
1 tsp grated nutmeg
2 eggs, one whole and one yolk beaten together
3 tablespoons of milk
3 tablespoons of water
Bring a large pan of water to boil. While it is heating, combine the dry ingredients in a small bowl. Make a well in the middle and pour in the eggs. Mix together. Now add the milk and water, stirring to make a thick batter.
To make the spatzle, spoon a small amount of the batter into a colander held over the pan of boiling water. Use a rubber spatula to scrape over the batter pushing it through the holes in the colander and into the boiling water below. Let the spatzle cook for about a minute then use a strainer or slotted spoon to scoop it out and into a bowl.

If you want you can make the spatzle early and then reheat it by sauteing it in some butter for a minute or two.
My favorite dish to make with spatzle uses sausage and a creamy mustard sauce. Even making the spatzle from scratch, the dish only takes about 20 minutes. A great warm dinner for a crisp fall night. (Not that we are having any of those here in Vegas yet) I prefer to use the spatzle recipe I listed above with Robert Irvine's sauce...his spatzle is ok, but we didn't think the extra ingredients really came through in the dish. The mustard sauce though? Outstanding.
Spatzle in Mustard Cream Sauce with Sausage, adapted from Robert Irvine
Spatzle, see above
1 lb sausage in casings (sweet or spicy both work!)
2 tablespoons unsalted butter
1 small shallot, minced
3 tablespoons white wine
1/2 cup heavy cream
1 teaspoon fresh thyme, minced
2 tablespoon Dijon Mustard (we used the Country Style Grey Poupon)
salt and freshly ground pepper
2 tablespoons grate Gruyere cheese
Prepare the spatzle as described in the recipe above and set it aside. Cook your sausages either in a grill pan or in a pot of boiling water. Once done, slice them into 1/2 inch rounds.
To make the sauce, heat a saucepan over medium. Add the butter and shallots and cook until the shallots are a nice golden brown. Pour in the white wine to deglaze the pan, then add the cream, thyme, and mustard. Taste and then season the sauce with salt and pepper. Put the sauce on low and continue to cook until it has thickened, about 5 minutes. Once the sauce is thick, remove the pan from the heat and stir in the cheese.
Pour about half of the sauce over the spatzle and toss to coat and reheat it. Place the spatzle on plates then put the sausage over the spatzle and spoon over a bit more sauce.

Comfort food at its, German-style, finest!
Quick and easy directions for the spatzle, then a great recipe to use it in to follow. :)
Spatzle, adapted from Gordon Ramsay (serves 2)
1 cup all-purpose flour
1 tsp salt
1 tsp grated nutmeg
2 eggs, one whole and one yolk beaten together
3 tablespoons of milk
3 tablespoons of water
Bring a large pan of water to boil. While it is heating, combine the dry ingredients in a small bowl. Make a well in the middle and pour in the eggs. Mix together. Now add the milk and water, stirring to make a thick batter.
To make the spatzle, spoon a small amount of the batter into a colander held over the pan of boiling water. Use a rubber spatula to scrape over the batter pushing it through the holes in the colander and into the boiling water below. Let the spatzle cook for about a minute then use a strainer or slotted spoon to scoop it out and into a bowl.

My favorite dish to make with spatzle uses sausage and a creamy mustard sauce. Even making the spatzle from scratch, the dish only takes about 20 minutes. A great warm dinner for a crisp fall night. (Not that we are having any of those here in Vegas yet) I prefer to use the spatzle recipe I listed above with Robert Irvine's sauce...his spatzle is ok, but we didn't think the extra ingredients really came through in the dish. The mustard sauce though? Outstanding.
Spatzle in Mustard Cream Sauce with Sausage, adapted from Robert Irvine
Spatzle, see above
1 lb sausage in casings (sweet or spicy both work!)
2 tablespoons unsalted butter
1 small shallot, minced
3 tablespoons white wine
1/2 cup heavy cream
1 teaspoon fresh thyme, minced
2 tablespoon Dijon Mustard (we used the Country Style Grey Poupon)
salt and freshly ground pepper
2 tablespoons grate Gruyere cheese
Prepare the spatzle as described in the recipe above and set it aside. Cook your sausages either in a grill pan or in a pot of boiling water. Once done, slice them into 1/2 inch rounds.
To make the sauce, heat a saucepan over medium. Add the butter and shallots and cook until the shallots are a nice golden brown. Pour in the white wine to deglaze the pan, then add the cream, thyme, and mustard. Taste and then season the sauce with salt and pepper. Put the sauce on low and continue to cook until it has thickened, about 5 minutes. Once the sauce is thick, remove the pan from the heat and stir in the cheese.
Pour about half of the sauce over the spatzle and toss to coat and reheat it. Place the spatzle on plates then put the sausage over the spatzle and spoon over a bit more sauce.

Comfort food at its, German-style, finest!
Friday, October 14, 2011
Shrimp Pasta with Chili and Lime
So yesterdays soup may not have been that low-calorie. Darn cream. But today's Shrimp pasta sure is! We make this one a lot, actually, because it is super quick and easy for a nice light weeknight dinner. It's definitely a "go-to" recipe for us.
The original recipe is Gordon Ramsay's but we've tweaked it quite a bit over time. (Nobody tell him though, he kind of scares me!) I like to use a Thai chili for some heat, a red bell pepper for sweetness, and I substitute cilantro for the parsley...because I just love cilantro.
This dish is really quick so make sure you have your pasta boiling before you start cooking the rest. And make sure to boil it in salted water. Angel hair is traditionally used in recipes with such a light sauce but we used fresh fettuccine this time and it was still great. Fresh pasta can be pricey in the grocery store but if you see it on sale or have a coupon definitely pick some up. It is unbelievable how much better fresh pasta is over dry.

Shrimp Pasta with Chili and Lime, adapted from Gordon Ramsay
1/2 lb cooked angel hair pasta
3 cloves garlic, crushed
4 green onions
1 red bell pepper, diced
1 thai chili, seeded for less heat, not seeded if you dare
1/4 cup white wine
1/2 lb uncooked shrimp, cleaned and without tails
olive oil
1 lime
handful of cilantro, chopped
In a large pan over medium heat, add about 1 tablespoon of olive oil. Once the oil is hot add the garlic, onions, and bell peppers. Cook them for about 4 minutes before adding the chili pepper. Now cook one additional minute.
Add the white wine to the pan and let it cook for about another minute or so. The wine will quickly reduce. Toss in the shrimp and cook them until they are pink. Only 2 to 3 minutes.
At this point get your pasta drained and into the pan with the shrimp, drizzle some olive oil over the pasta, squeeze over the lime juice and toss in the cilantro. Toss the whole thing to combine.
Done. Simple right? And so good. I hope you enjoy it.
Thursday, October 13, 2011
Spicy Pumpkin Soup
I have a very large place in my heart for pumpkins. I loooove them. :) I could eat an entire pumpkin pie, can't wait each year for Starbucks to bring in the pumpkin spice lattes, and I love pumpkin soup.
Usually I buy all fresh ingredients for my recipes. Little sugar pumpkins are easy to bake, but the canned stuff is pretty awesome too. 100% Pumpkin, pureed and ready to go. Now, you may not have noticed but sometimes Mr Pears and I like to make things kind of complicated (see Tuesday's 6-hour French Onion Soup for evidence). But yesterday I decided that I wanted pumpkin soup and I was going to do it easy. It was easy, and it was delicious.
This recipe is really simple and really easy but it is a little spicy and a little sweet and it's just a great fall soup. To make it even easier on myself I made up the soup during nap time, all the way up to blending it. Then I poured the soup into two containers, one to put in the freezer for another time and one to put in the refrigerator for dinner. Then, when we were ready to eat it, I warmed it up and added the milk, etc. to finish it up. It only took a few minutes to complete. Awesome. I hope you try it out!

Spicy Pumpkin Soup, adapted from Simply Recipes
3 tablespoons unsalted butter
1 large yellow onion, chopped
2 teaspoons garlic, minced
1/2 teaspoon crushed red pepper
2 teaspoons curry powder
1/2 teaspoon ground coriander
2 dashes of cayenne pepper (this is to taste! feel free to leave this out for a less spicy soup)
5 cups chicken broth
3 (15 oz) cans of 100% pumpkin puree (6 cups if you are making it yourself!)
1/2 cup brown sugar
2 cups milk
1/2 cup heavy cream
Melt your butter in a large soup pot over medium heat. Put in the onions and garlic and cook them for about 5 minutes or until soft. Next add in all the spices and cook them, stirring, for about a minute longer. Add your pumpkin puree and chicken broth to the pot and stir well to combine. Bring the soup to a boil and then allow it to simmer for 15 minutes.
After simmering, let the soup cool down a bit before transfering it into the blender (you will need to do this in a few batches, probably 3). Puree the soup until smooth. At this point, if you don't want to eat this soup right away (or even today) you can refrigerate it or freeze it until you need it.
If eating now, put the soup back into the pot on low heat. Stir in the brown sugar, then the milk and the cream. Taste it and season with salt and pepper if necessary.
Enjoy!
Wednesday, October 12, 2011
Thai Beef Cabbage Cups
Is it happens, Mr Pears and I both managed to gain a few LB's in Hawaii. It could have been the breakfast buffet which was included with our room reservation, but I'm guessing it was all those drinks in the plastic pineapples. Oops.
So in an effort to eat a bit more low-calorie dinners for a while, I made these Thai beef cups the other night. Of course lettuce wraps are so popular so I was kind of surprised (and maybe a little skeptical) of using cabbage instead. I was pleasantly surprised. These were light, but very tasty with a little kick and a lot of crunch. Great texture and flavor. Not only that but according to the recipe each serving is only 292 calories. The recipe says this is four servings but it made a good dinner for the two of us, with no other sides. And under 600 calories for dinner? That is pretty good in my book.

Thai Beef Cabbage Cups, adapted from Cooking Light
2 1/2 teaspoons sesame oil, divided
2 teaspoons minced ginger
3 garlic cloves, minced
1 pound ground sirloin
1 tablespoon sugar
2 tablespoons lime juice
1 1/2 tablespoons fish sauce
1 tablespoon water
1/2 teaspoon crushed red pepper (or to taste!)
1/2 cup vertically sliced red onions
1/2 cup cilantro, chopped
8 large green cabbage leaves
2 tablespoon unsalted, dry-roasted peanuts, chopped
In a large skillet over medium-high heat, heat 2 teaspoons of sesame oil and then cook the garlic and ginger for a bout 1 minute. Add the meat and cook until browned through.
In a large bowl, whisk together the remaining sesame oil, sugar, lime juice, fish sauce, water and red pepper. Toss in the meat, onions, cilantro and peanuts and stir to combine. Serve on top of the cabbage leaves.
We didn't serve these to the kids because of time issues, but next time we will probably cut out the red pepper so they can have some. One recipe reviewer claimed she did that for her own kids and then just had some sliced fresh jalapenos for herself and her husband, which I think is a great idea for us too.
Happy, Healthy, Eating!
Friday, September 23, 2011
Turkey Meatball Stroganoff
As some of you may have noticed, my favorite cook book for the kids is by far Start Fresh by Tyler Florence (and you can get it in The Pantry!) It is full of kid-friendly recipes that are healthy and above all, flavorful. You won't find any bland baby food in this book.
It is my supreme belief that we have to teach our children to eat, just like we teach them to put themselves to sleep, walk, talk and read. And teaching requires effort. By making an effort to introduce as many foods and flavors as possible, as early as possible, we are giving our children the building blocks for making good nutrition choices for the rest of their lives.
If you and your baby are just starting out on the journey into solid foods Start Fresh has a ton of recipes for purees. Flavor combos like spinach and banana, parsnip fig and pear, or carrot and mango. Tyler also teaches parents how to get the most flavor from foods. You won't have much need of a steamer basket using this book.
If your baby is a bit older, like mine are, you'll be sure to find recipes the whole family will love. I think the biggest, and only, real downside to this book is the lack of recipes that target finger feeders. I don't know about everyone else but my little guys weren't ready to wield a fork and spoon by the time they were interested in self-feeding. We are going to start working on that soon but for now finger foods rule in my house. Though Tyler doesn't dedicate a section to that "art" of eating, some of his recipes can be eaten with fingers and we've yet to come across one the babies didn't like. I like that this is a book that took us from baby to toddler and on with interesting recipes to keep us trying new things and new flavors. A great buy if you are in the market.
A few weeks ago we tried yet another recipe from this book. The kids enjoyed it, and had mushrooms for the first time! (They loved them.) This is a great meal for the whole family. The turkey meatballs are moist and easy for babies without molars to enjoy and it incorporates every kids' favorite food, pasta. I hope you enjoy it.
Turkey Meatloaf Stroganoff, adapted from Tyler Florence- found in Start Fresh
1 slice multigrain bread
1 1/2 lbs ground turkey
2 tablespoons whole milk
1/2 medium onion, diced
1 teaspoon caraway seeds, crushed
salt
2 tablespoons olive oil
1 clove garlic, minced
6 ounces white mushrooms, sliced
1 sprig thyme
2 tablespoon all-purpose flour
2 1/2 cups chicken stock
1/4 cup sour cream
1 tablespoon dijon mustard
8 oz cooked egg noodles
2 tablespoons chopped parsley
Tear up the bread and put it in a large mixing bowl with the turkey, milk, caraway seeds, onion and a bit of salt. Mix all of it together with your hands to combine. Shape the mixture into 1 1/2 inch meatballs. This makes about 18. (plenty of leftovers for the kids to eat the next day!)
Heat the olive oil in a large skillet over medium heat. When the oil begins to shimmer add the meatballs and brown them. Remove them to a baking tray and finish cooking them in the oven, 20 minutes at 350 F.
While the meatballs cook, cook the pasta and begin the sauce. For the sauce add the garlic to the skillet you cooked the meatballs in. Cook the garlic for about a minute and then add the mushrooms and the thyme. Cook them 2-3 minutes or until golden and then sprinkle the flour over the mushrooms and stir them around to coat. Add the chicken stock and cook until the stock has thickened, about 10-12 minutes.
Once it the sauce is thick, whisk in the sour cream and the mustard. Keep on warm until the meatballs are done. Once they are put them into the sauce and turn to coat. Serve the meatballs and sauce over the pasta and top with the parsley.
Aaron concentrating on eating

And feeding Claire too, of course

Wednesday, September 21, 2011
Schnitzel Biscuits?
Weird name, great sandwich.
We watched Food Network Star for the first time this past season (#7) and we were excited when Jeff Mauro won. (Though we were rooting for Vic Vegas too, of course) Jeff dubbed himself the "Sandwich King" and I was happy that Food Network picked him for a show. I mean, who doesn't love a good sandwich?
Sometimes it seems like when you are at home a sandwich need consist only of bland sandwich bread, lunch meat and cheese. Blah. But why not make a restaurant quality sandwich at home? Sure its a little more (ok, a lot more) effort...but according to Jeff you can make "any meal a sandwich and any sandwich a meal", and a meal deserves a little more effort.
Now that his show is running (though I admit we still haven't seen it...must set DVR) we decided to try and make one of Jeff Mauro's sandwiches. After perusing the short list on Food Network we went with the Schnitzel Biscuits. Apparently schnitzel is Austrian for thinly pounded, fried, meat...yum. Add a biscuit and some braised cabbage and you have one very lovely sandwich.

There are four elements to this sandwich but none are particularly difficult or time consuming and the sandwich really comes together in the end. **Bonus** if you aren't making 8 sandwiches you'll have left over biscuits for breakfast the next day! In fact, if you aren't interested in making the entire sandwich, just the recipe for the biscuits alone is worth keeping. They were simple, easy and delicious. The cabbage was amazing too and would be great with pork chops. But really, try the sandwich.
Schnitzel Biscuits, adapted from Jeff Mauro
Pork
3 tablespoons salt
1 tablespoon sugar
1 pork tenderloin, silver skin removed, about 1 1/2 lbs
black pepper
1 cup all-purpose flour
2 eggs, beaten
2 cups Panko breadcrumbs
3 tablespoons vegetable oil, for frying
Biscuits
4 cups self-rising flour (see easy substitution here)
1 stick butter, plus 3 more tablespoons melted
1 tablespoon vegetable oil
Cider-Braised Cabbage
2 tablespoons butter
1 tablespoon caraway seeds
3/4 cup apple cider
2 tablespoons apple cider vinegar
salt and pepper
Raspberry Mayo
1 cup mayonnaise
1 tablespoon lemon juice
1 tablespoon raspberry preserves
1/2 teaspoon lemon zest
pepper
To begin you'll brine the pork tenderloin. Mix the salt and sugar with 6 cups of ice cold water until everything has dissolved. Pour the liquid into a gallon sized ziplock bag and then put in the pork. Put the bag in a large bowl and then place the bowl into the refrigerator for at least an hour.
Next you can make the mayo. Just mix all the ingredients together in a small bowl, cover it with plastic and put it into the refrigerator as well.
Time for the biscuits. Preheat the oven to 425 F and place a large cast iron skillet inside so that it preheats as well. Cut the butter into the flour in a large bowl, work quickly until the mixture is very crumbly. Add in the buttermilk very slowly (I only needed 2 cups) until the dough forms and but is still fairly moist. Turn the dough onto a floured surface and roll it into a ball with your hands and then press it out until it is about 1 inch thick. No rolling pin needed, woo hoo! Now using a drinking glass or a biscuit cutter, cut out 8 biscuits about 3 inches in diameter.
Take the hot skillet out of the preheated oven and carefully add the vegetable oil to it. Put in the biscuits, touching each other, then brush the tops with the melted butter. Put the skillet back in the oven to bake about 15 minutes. They should be nice and golden brown when they are done.

Meanwhile start the cabbage. Heat a large heavy pan, like a dutch oven, over medium heat. Melt the butter and then add the caraway seeds and cook them until fragrant, only about a minute. Add the cabbage to the pot a bit at a time to wilt it. Once it is all in, add the cider and vinegar and let simmer for 15 minutes. I kept my pot covered for most of that time. Once the cabbage is soft, season it with salt and pepper and put it on low while you are finishing up.
Lastly, the pork. Remove the pork from the brine and dry it with paper towel. Cut it into eight 1 inch rounds and then pound each to about 1/4 inch thickness. Season with salt and pepper. For your batter put the flour onto one plate, the beaten eggs another, and the panko on a third. Put a wire rack over a baking sheet to set the pork on once battered. Coat each slice of pork in each dish in turn and set on the rack.
Heat the oil in a large pan on medium heat. Once the oil is hot fry each slice of pork for about 3 to 4 minutes per side.
Put some of the mayo on your freshly baked biscuits along with a slice of pork or two and some of the cabbage. Serve more cabbage on the side, it is good stuff! Enjoy!
We watched Food Network Star for the first time this past season (#7) and we were excited when Jeff Mauro won. (Though we were rooting for Vic Vegas too, of course) Jeff dubbed himself the "Sandwich King" and I was happy that Food Network picked him for a show. I mean, who doesn't love a good sandwich?
Sometimes it seems like when you are at home a sandwich need consist only of bland sandwich bread, lunch meat and cheese. Blah. But why not make a restaurant quality sandwich at home? Sure its a little more (ok, a lot more) effort...but according to Jeff you can make "any meal a sandwich and any sandwich a meal", and a meal deserves a little more effort.
Now that his show is running (though I admit we still haven't seen it...must set DVR) we decided to try and make one of Jeff Mauro's sandwiches. After perusing the short list on Food Network we went with the Schnitzel Biscuits. Apparently schnitzel is Austrian for thinly pounded, fried, meat...yum. Add a biscuit and some braised cabbage and you have one very lovely sandwich.

There are four elements to this sandwich but none are particularly difficult or time consuming and the sandwich really comes together in the end. **Bonus** if you aren't making 8 sandwiches you'll have left over biscuits for breakfast the next day! In fact, if you aren't interested in making the entire sandwich, just the recipe for the biscuits alone is worth keeping. They were simple, easy and delicious. The cabbage was amazing too and would be great with pork chops. But really, try the sandwich.
Schnitzel Biscuits, adapted from Jeff Mauro
Pork
3 tablespoons salt
1 tablespoon sugar
1 pork tenderloin, silver skin removed, about 1 1/2 lbs
black pepper
1 cup all-purpose flour
2 eggs, beaten
2 cups Panko breadcrumbs
3 tablespoons vegetable oil, for frying
Biscuits
4 cups self-rising flour (see easy substitution here)
1 stick butter, plus 3 more tablespoons melted
1 tablespoon vegetable oil
Cider-Braised Cabbage
2 tablespoons butter
1 tablespoon caraway seeds
3/4 cup apple cider
2 tablespoons apple cider vinegar
salt and pepper
Raspberry Mayo
1 cup mayonnaise
1 tablespoon lemon juice
1 tablespoon raspberry preserves
1/2 teaspoon lemon zest
pepper
To begin you'll brine the pork tenderloin. Mix the salt and sugar with 6 cups of ice cold water until everything has dissolved. Pour the liquid into a gallon sized ziplock bag and then put in the pork. Put the bag in a large bowl and then place the bowl into the refrigerator for at least an hour.
Next you can make the mayo. Just mix all the ingredients together in a small bowl, cover it with plastic and put it into the refrigerator as well.
Time for the biscuits. Preheat the oven to 425 F and place a large cast iron skillet inside so that it preheats as well. Cut the butter into the flour in a large bowl, work quickly until the mixture is very crumbly. Add in the buttermilk very slowly (I only needed 2 cups) until the dough forms and but is still fairly moist. Turn the dough onto a floured surface and roll it into a ball with your hands and then press it out until it is about 1 inch thick. No rolling pin needed, woo hoo! Now using a drinking glass or a biscuit cutter, cut out 8 biscuits about 3 inches in diameter.
Take the hot skillet out of the preheated oven and carefully add the vegetable oil to it. Put in the biscuits, touching each other, then brush the tops with the melted butter. Put the skillet back in the oven to bake about 15 minutes. They should be nice and golden brown when they are done.
Oops I made nine!

Meanwhile start the cabbage. Heat a large heavy pan, like a dutch oven, over medium heat. Melt the butter and then add the caraway seeds and cook them until fragrant, only about a minute. Add the cabbage to the pot a bit at a time to wilt it. Once it is all in, add the cider and vinegar and let simmer for 15 minutes. I kept my pot covered for most of that time. Once the cabbage is soft, season it with salt and pepper and put it on low while you are finishing up.
Lastly, the pork. Remove the pork from the brine and dry it with paper towel. Cut it into eight 1 inch rounds and then pound each to about 1/4 inch thickness. Season with salt and pepper. For your batter put the flour onto one plate, the beaten eggs another, and the panko on a third. Put a wire rack over a baking sheet to set the pork on once battered. Coat each slice of pork in each dish in turn and set on the rack.
Heat the oil in a large pan on medium heat. Once the oil is hot fry each slice of pork for about 3 to 4 minutes per side.
Put some of the mayo on your freshly baked biscuits along with a slice of pork or two and some of the cabbage. Serve more cabbage on the side, it is good stuff! Enjoy!
Friday, September 16, 2011
Crab Cakes
I'm originally from Maryland and Maryland is, of course, known for Blue Crabs. Growing up I spent plenty of time sitting around picnic tables covered in newspaper, up to my elbows in Old Bay seasoning and crab shells. Picking crabs is a lot of work and I usually left the table hungry. It's really more of a social thing than an eating thing. At least for me. If I'm really hungry for crabs, I'd rather a nice crab cake.
I really like these crab cakes because they have the nice sweet flavor of the peppers and onions, a hint of Old Bay, and most of all- because they are crunchy. Instead of using regular bread crumbs I've swapped them out for Panko. The panko give the cakes a bit of crunch and keep them from being the least bit oily from frying. These cakes are nice and light, not oily and dense. Very delicious.
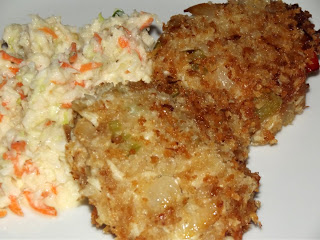
Crab Cakes, adapted from Emeril Lagasse
2 tablespoons olive oil
1/2 cup diced celery
1/2 cup diced red peppers
1/2 cup diced green peppers
salt and pepper
1 tablespoon chopped garlic
1 pound lump crab meat
1/2 cup chopped green onions
1/2 cup mayonnaise
1/2 teaspoon Worcestershire sauce
1/2 teaspoon hot sauce
1 1/2 cups Panko, divided
1/4 cup all-purpose flour
1 tablespoon Old Bay seasoning
1 egg
2 1/2 cups vegetable oil, for frying
Heat the olive oil in a large pan over medium heat. Saute the onions, celery and peppers with a bit of salt and pepper for about 5 minutes. Add the garlic and gook for 2 minutes more. Remove from heat and set aside to cool for a few minutes.
Place the mayo in a large bowl and stir in the Worcestershire sauce and hot sauce. Add in the crab meat, veggies and 3/4 cup of the Panko. Mix to combine.
On a small plate mix the flour with 1/2 tablespoon of Old Bay. In a small bowl slightly beat the egg with about a tablespoon of water. On a second plate, put the rest of the Panko.
Heat the vegetable oil in a large pan to 360 F.
Make the crab mixture into patties (about 1/3 cup filling each). Dredge them in the flour, then dip them into the egg wash, and then cover them in panko.
Fry the cakes in the hot oil for about 4 minutes per side. Place on a try covered with paper towels to drain excess oil.
I really like these crab cakes because they have the nice sweet flavor of the peppers and onions, a hint of Old Bay, and most of all- because they are crunchy. Instead of using regular bread crumbs I've swapped them out for Panko. The panko give the cakes a bit of crunch and keep them from being the least bit oily from frying. These cakes are nice and light, not oily and dense. Very delicious.

Crab Cakes, adapted from Emeril Lagasse
2 tablespoons olive oil
1/2 cup diced celery
1/2 cup diced red peppers
1/2 cup diced green peppers
salt and pepper
1 tablespoon chopped garlic
1 pound lump crab meat
1/2 cup chopped green onions
1/2 cup mayonnaise
1/2 teaspoon Worcestershire sauce
1/2 teaspoon hot sauce
1 1/2 cups Panko, divided
1/4 cup all-purpose flour
1 tablespoon Old Bay seasoning
1 egg
2 1/2 cups vegetable oil, for frying
Heat the olive oil in a large pan over medium heat. Saute the onions, celery and peppers with a bit of salt and pepper for about 5 minutes. Add the garlic and gook for 2 minutes more. Remove from heat and set aside to cool for a few minutes.
Place the mayo in a large bowl and stir in the Worcestershire sauce and hot sauce. Add in the crab meat, veggies and 3/4 cup of the Panko. Mix to combine.
On a small plate mix the flour with 1/2 tablespoon of Old Bay. In a small bowl slightly beat the egg with about a tablespoon of water. On a second plate, put the rest of the Panko.
Heat the vegetable oil in a large pan to 360 F.
Make the crab mixture into patties (about 1/3 cup filling each). Dredge them in the flour, then dip them into the egg wash, and then cover them in panko.
Fry the cakes in the hot oil for about 4 minutes per side. Place on a try covered with paper towels to drain excess oil.
Tuesday, September 6, 2011
How-To Tuesday! Pizza Dough
Pizza is one of my favorite things to eat. Like I said yesterday, it is right up there with Cheeseburgers. But, for me, there is a big difference between good pizza and bad pizza. I'm not a big fan of delivery pizza and frozen pizzas are pretty bad too. When I lived in Maryland my favorite was Ledo's. Its a franchise now but my family has been going there since the original opened in 1955- and growing up we ate Ledo's a lot. Out here in Las Vegas I like Grimaldi's. They make coal-fired pizza and the toppings are delicious. But even though a new Grimaldi's just opened up a few minutes from us, we probably won't be eating there anytime soon. We just don't take the kids out to restaurants very often yet. We are such wimps. :P
Instead, to calm my pizza cravings, I learned to make pizza dough! Sure you can buy it at a lot of grocery stores now, but making it from scratch is really easy and very economical. Pretty tasty too.
Pizza Dough, adapted from Gordon Ramsay Makes It Easy
(makes 2 large pizza crusts)
2 teaspoons active dry yeast
1 cup warm water
4 cups bread flour **
1 Tablespoon olive oil
**If you don't want to by bread flour like me, you can buy wheat gluten to add to all-purpose flour. Whole Foods sells it.
In a small bowl add the yeast to the warm water. Stir it in and let it set for about 10 minutes. You can make this dough in a stand mixer with the dough hook or in a food processor with the dough blade. Put your flour and the olive oil into either and then turn it on low and add the yeast/water to it as well. Mix or process until the dough leaves the sides of the bowl and sticks together. It should be nice and smooth when it is done. Add a little water or flour as needed to get the right texture. Once it is done put the dough in an oiled glass bowl, cover it with plastic wrap and allow it to double in size. It shouldn't take more than an hour.
Split the finished dough in half and either freeze the dough or roll it out on a floured surface to the desired size and shape. I usually make one large pizza and freeze the other half of the dough for another day.
Find the perfect sauce (I like this one) and the perfect toppings to make your pizza! For me, good toppings are just as important as good crust and good sauce. All three parts are essential to a really good pizza. My favorite toppings are sausage, onions, and fresh tomatoes. Looks and tastes amazing. ENJOY!
My masterpiece before it went into the oven.

Thursday, September 1, 2011
Grilling for Labor Day
Is it against the law in the United States to NOT grill out on Labor Day? Kind of feels like it. Labor Day is a holiday for enjoying the last bit of summer, and Summer = Grilling. So grill something! Can I suggest burgers?
I am a HUGE fan of burgers. I ate vegetarian for three years while in my 20's and it was the craving for cheeseburgers that finally made me give it up.

Burgers are the go-to grilling item but they don't need to be boring or bland. When most of us want to make up some burgers we head to the meat section at the grocery store and grab some ground beef. 80/20 makes a good burger....grass-fed beef is pretty great...but the best burger we've made came from ground brisket. Upon Tyler Florence's advice, Alex and I tossed 2 lbs of beef brisket, cut into chunks, into the meat grinder. What? You don't have a meat grinder? Shocking. Well, in that case, ask the butcher to grind it for you. Most grocery stores will; they definitely will at Whole Foods. And believe me, its worth asking for. A little ground brisket, some salt and pepper, and a few awesome toppings and you will have yourself an amazing burger to celebrate Labor Day.
Cheese Burgers, adapted from Tyler Florence
2 pounds beef brisket, ground
kosher salt and freshly ground pepper
4 slices of Swiss Cheese (or any other favorite cheese!)
1 large sweet onion, sliced
1 tablespoon butter
1 large tomato
Before you start on the burgers, get your toppings ready. Slice the tomato and season the slices with salt and pepper and set them aside. It is amazing what a little salt and pepper do to a tomato. Now to caramelize the onions. In a large frying pan melt the butter over medium heat. Add the onions to the pan and allow them to cook very slowly, about 20 minutes. They will be soft and golden brown and incredibly sweet!
Once the onions are almost done fire up the grill. Season the ground meat with salt and pepper and mix them in with your hands. Now form the meat into 4 patties. To keep them flat on top while they are cooking, create an indentation in the middle of each patty. Put the burgers on the hot grill and cook for about 5 minutes per side for medium. About a minute before they are done, top them with cheese.
Make sure to put your finished burgers on great tasting buns and top them with a slice of tomato and some of the onions. I like a bit of mayo on my burger too. :) The addition of the ripe seasoned tomato and the sweet onions to a very juicy burger is unbelievably good. So enjoy it! And enjoy the long weekend.
I am a HUGE fan of burgers. I ate vegetarian for three years while in my 20's and it was the craving for cheeseburgers that finally made me give it up.
Yummy.

Burgers are the go-to grilling item but they don't need to be boring or bland. When most of us want to make up some burgers we head to the meat section at the grocery store and grab some ground beef. 80/20 makes a good burger....grass-fed beef is pretty great...but the best burger we've made came from ground brisket. Upon Tyler Florence's advice, Alex and I tossed 2 lbs of beef brisket, cut into chunks, into the meat grinder. What? You don't have a meat grinder? Shocking. Well, in that case, ask the butcher to grind it for you. Most grocery stores will; they definitely will at Whole Foods. And believe me, its worth asking for. A little ground brisket, some salt and pepper, and a few awesome toppings and you will have yourself an amazing burger to celebrate Labor Day.
Cheese Burgers, adapted from Tyler Florence
2 pounds beef brisket, ground
kosher salt and freshly ground pepper
4 slices of Swiss Cheese (or any other favorite cheese!)
1 large sweet onion, sliced
1 tablespoon butter
1 large tomato
Before you start on the burgers, get your toppings ready. Slice the tomato and season the slices with salt and pepper and set them aside. It is amazing what a little salt and pepper do to a tomato. Now to caramelize the onions. In a large frying pan melt the butter over medium heat. Add the onions to the pan and allow them to cook very slowly, about 20 minutes. They will be soft and golden brown and incredibly sweet!
Once the onions are almost done fire up the grill. Season the ground meat with salt and pepper and mix them in with your hands. Now form the meat into 4 patties. To keep them flat on top while they are cooking, create an indentation in the middle of each patty. Put the burgers on the hot grill and cook for about 5 minutes per side for medium. About a minute before they are done, top them with cheese.
Make sure to put your finished burgers on great tasting buns and top them with a slice of tomato and some of the onions. I like a bit of mayo on my burger too. :) The addition of the ripe seasoned tomato and the sweet onions to a very juicy burger is unbelievably good. So enjoy it! And enjoy the long weekend.
Subscribe to:
Posts (Atom)