Wednesday, March 28, 2012

Sneaky Oatmeal Raisin Cookies

Ok, I have another sneaky hidden vegetable recipe for you. When I read over this recipe I honestly thought that the odds of this one actually being good were like 50 : 50. But since Oatmeal cookies sounded kind of delicious and tricking my kids into eating more veggies is my new mission, I figured I would give them a whirl anyway.

I'm really glad I did give this recipe a try because these cookies are good! I mean, even if your toddler eats all their veggies with no fuss, and I have to wonder...do toddlers like that even exhist? Anyway even if you are super blessed and your little monsters eat veggies these are worth making. Or maybe you don't have toddlers or kids? Still try them, you can never have too many veggies (or cookies).

And dont freak out when you read the ingredients. Yeah I know cookies made with zucchini and whole wheat flour sound yucky...they aren't I promise!


Oatmeal Raisin Cookies, adapted from Jessica Seinfeld in Deceptively Delicious
1 zucchini or 1/2 cup zucchini puree
1 banana, fork mashed into a puree
1 cup whole wheat flour
1 cup old-fashioned oats
1 teaspoon baking soda
1/2 teaspoon salt
1/4 teaspoon cinnamon
3/4 cup firmly packed brown sugar (I used dark but light works too)
6 tablespoons room temperature butter
1 large egg white
1/2 cup raisins
1/2 cup chopped walnuts (optional)

Before you get started on the cookies you need to puree the zucchini. Now is also a good time to take the butter out of the fridge if you havent already. To puree the zucchini just chop it into a few big chunks and put it in a steamer basket set over an inch of boiling water. Cover the pot and steam for about 8 minutes. Once done, put the succhini in the food processor or blender and blitz until smooth.

In a small bowl mix tgether the flour, oats, salt, baking soda, and cinnamon. Set aside.

In a mixing bowl mix the butter and brown sugar together with a wooden spoon just until combined. This is a soft dough so dont bother with your mixer for this one. Add in your zucchini puree (it should be about half a cup), your banana puree and the egg white and stir to combine. Now mix in the dry ingredients just until combined. Lastly stir in the raisins and nuts if you are adding them.

Line two cookie sheets with silplats or parchment paper. Spray the paper with non-stick cooking spray if you arent using silplats. Drop dough by tablespoons onto the trays. Bake for about 12 minutes.


Remove the trays from the oven and let the cookies cool a minute or two before transferring them to wire racks to finish cooling.


I hope you love these as much as we do! Enjoy.

Friday, March 23, 2012

Easy Homemade Lollipops

I made lollipops yesterday and I am still super impressed with myself.  Never thought I'd be spending nap time making candy.  Especially since I was torn between making lollipops and basking in the sunshine on such a beautiful day.  Lucky for you, lollipops won.

Lollipops won because it is almost Easter, you know.  I used to be all anti-Easter bunny since I have no idea what a bunny who delivers eggs has to do with the risen Savior...know what I mean?  Well, having kids has changed my mind on the whole thing and now I just see the bunny stuff as one more special time of the year to do some super fun stuff with the kids.  We will be making sure they know the REAL meaning of the holiday is much more important.

But back to the lollipops.  My kids are still a little young (18 months next week, eek!) for the traditional candy-filled basket but we did discover they had a liking for lollipops while over at Great Clips trying to wrangle them into hair cuts.  Of course a bag of Dum-Dums may have been a slightly easier route but I'm telling you these are really super easy and if you're anything like me you'll be really proud of yourself when you can present them to people.

Like this phone conversation:
  Mr Pears:  Hi honey, what are you doing?
  Me:  Oh, just making some lollipops

Sounds cool right?  Ah I'm a dork.  oh well.

But they did come out great and I am excited to put a few of these babies into the kids' baskets come Easter.


Cherry Lollipops, adapted from Paula Deen
makes 20 lollipops (or more if you make them a bit smaller)
3/4 cup granulated sugar
1/2 cup light corn syrup
1 (3 oz) box cherry gelatin (you know...Jello)
Non-stick vegetable cooking spray

You'll also need
lollipop sticks (craft store carries these)
plastic wrappers (I used Pretzel stick wrappers I found at the craft store) or just plain plastic wrap
clip-on thermometer for your pot

Normally I'm pretty bad about reading directions thoroughly.  It's best to read these through and get out everything you need in advance so you don't get flustered while cooking hot sugar.

First set up your candy sticks.  Lay parchment paper on two baking sheets;  I cut the paper to fit so the paper laid inside nice and flat.  Spray the paper with the cooking spray and lay out your sticks.  I staggered mine so I could pour the candy on first one side then the other to give me some more space.


Next spray the inside of your liquid measuring cup with cooking spray and then measure out your corn syrup. Pour that and the sugar into a small saucepan and put it over medium heat.  Stir them together to dissolve the sugar and bring to a bowl slowly on medium.  Once you hit the boiling point, put in your thermometer.  Continue cooking until the sugar gets to 300 F.  Stir frequently.


Once you hit 300 F quickly remove the pot from the heat and stir in the cherry gelatin.  Moving quickly (but be careful this stuff is HOT!) spray a metal tablespoon (measuring spoon) with cooking spray and use it to pour the hot candy over the sticks.  Just pour the candy right so it covers the top portion of the stick.  It will spread out nicely into circle lollipops!  This stuff  hardens quickly so don't dally! :)


Now they just need to cool and then you can wrap them in plastic.  Be careful to note the size of your wrappers before you start pouring candy.  I got a little carried away and some of my pops didn't fit into my wrappers.  No biggie, I just wrapped those in plastic wrap instead.  The pretzel wrappers did work well for the others though, I just trimmed them so they were a little shorter than the lollipop.  They came with little twist ties which was nice.  I have no idea if they sell actual lollipop wrappers because for some reason these were the only ones I could find.

Here's your end product....


Nice, huh?  And they taste really good too. :)  The perfect Easter treat for your snuggle bunnies.  Enjoy!

Wednesday, March 21, 2012

A Different Kind of Recipe - Finger Paint

Monday I finally worked up the nerve to try finger painting with the boys!  I've been wanting to do it for a while but the idea of the mess really had me scared.  This fear of mess is the same reason I still spoon feed yogurt to my kids half of the time instead of letting them practice their spoon skills.  But Anyway! I got over it and it was pretty fun!

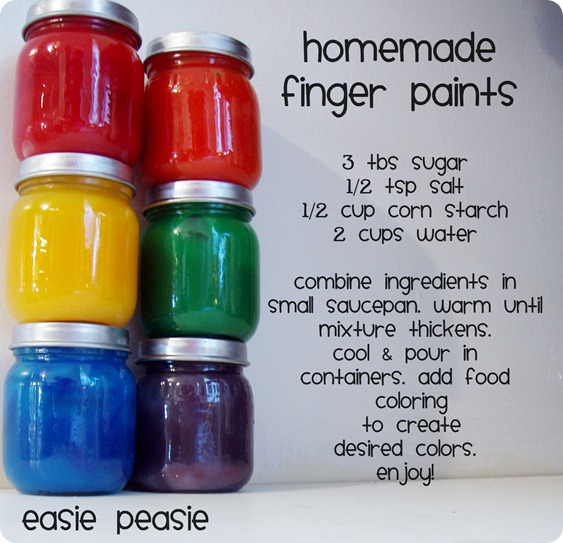
I found a recipe online for non-toxic, edible (but not for eating) finger paints.  The name of the blog from which I got the recipe says it all, Easie Peasie.  Mix the ingredients together until it thickens, cool slightly and pour into containers, stir in food coloring.  Viola.  The paints came out nice but were a little gel-y the next day so before I put them on the kids paper "palettes" I mixed in a bit of water to thin them out.  

Hop on over to Easie Peasie if you need more details!


To avoid a huge mess and a mommy meltdown, I covered our glass kitchen table with newspaper (I taped it down), put a sheet of newspaper on each kids' chair (under the booster, our kitchen table chairs are upholstered! gasp!) and stripped the babies down to pj pants since we did this activity about 30 minutes after breakfast.  

The kids "painted" a little bit but mostly had fun swirling the paints together on their paper plates.  Aaron, as usual, tasted quite a bit of his paint but since it is made up of mostly cornstarch and water it was all good.

These finger paints didn't stain hands, clothes or anything else!  I was pretty pleased with the lack of mess and we'll definitely being doing this activity again soon.

Here's a couple of pics...sorry there aren't many but Momma was too busy getting her hands dirty too. :P

Alex giving the "paint" a taste


Aaron enjoying himself :)


Monday, March 19, 2012

Hiding the Veggies

We have entered the phase of toddlerhood where my children will not just eat whatever I put in front of them without question.  They used to just eat anything and it was awesome.  I, of course, attributed this to my having introduced them to lots of different foods and flavors from the start.  (Go Me!) Well....I still think I did the right thing and I will continue as I began but I may have to get a bit trickier over here for a while.

Of my two boys, one will eat mostly anything...the other (Aaron) prefers bread, cheese and hot dogs.  Nice, huh? The kid won't even eat pasta or pizza! Luckily for me he does eat a lot of fruits and proteins. He chowed down on pork tenderloin for dinner just last night; he just doesn't want any veggies.  Except for french fries of course. I am going to need to hide some veggies.

In the past I've loaded up my Turkey Meatloaf with veggies, put sweet potatoes in the pancakes and even made zucchini bread which both kids LOVE.  But I was running out of ideas so I picked up Jessica Seinfeld's Deceptively Delicious last week from the library.  This cookbook is all about hiding the veggies.  Her method does require a little extra work because she makes veggie purees and puts them into regular dishes.  Sort of like Tyler Florence's Butternut Squash Mac and Cheese which my kids used to love until Aaron decided to boycott pasta.

Anyway.  I figured that with the help of my trusty food processor I could definitely give some of this stuff a shot. My goal is to make a different veggie filled item for the kids each week. I'm going to try to sneak in some veggies in where I can.  But this doesn't mean I'm going to stop putting "regular" veggies on their plates!  I think kids need to keep seeing good healthy foods on their plates to help accustom them with these things.  I'm confident that with constant exposure they will eventually try a bite or two and maybe even come to like them sometime down the road.  And what does it hurt?  My husband and I are eating these things already so it really isn't a big waste.

So my first "hidden" veggie recipe from Deceptively Delicious was the Applesauce Muffins.  These are loaded with applesauce and a 1/2 cup of butternut squash gets "sneaked" in.  They are moist and pretty tasty (you can't taste the squash I swear) and the kids love them.  They each ate a whole muffin for snack yesterday, success!


Applesauce Muffins adapted from Jessica Seinfeld found in Deceptively Delicious
Topping:
2/3 cup old-fashioned oats
1/4 cup firmly packed light or dark brown sugar
1 teaspoon cinnamon
2 tablespoons unsalted butter, melted
Batter:
1 1/2 cups all-purpose flour
1 cup old-fashioned oats
1 teaspoon baking powder
1/2 teaspoon baking soda
1/2 teaspoon cinnamon
1 cup unsweetened applesauce
1/2 cup milk
1/2 cup butternut squash puree
1/2 cup firmly packed light or dark sugar
1/4 cup canola oil
1 large egg

To start, make your butternut squash puree by splitting a small to medium sized butternut squash in half and laying it cut side down on an oiled baking dish.  Roast it at 400 F for about 25 minutes until it is very tender.  Scoop out the flesh and puree it in a food processor or blender.  Add a few tablespoons of water if needed.  Let it cool.


Now make the topping.  Just stir together all the ingredients in a small bowl to combine.


Make the batter: combine the dry ingredients in a medium bowl and the wet ingredients (including the squash) in a larger bowl.  Mix the dry ingredients into the wet ingredients slowly.  Don't over-mix, lumps are ok!


Now line a muffin pan with paper cups or spray them with non-stick cooking spray.  Fill the cups with batter and top each with streusel topping.


Bake for 18 to 20 minutes at 400 F.  A toothpick inserted in a muffin should come out clean when they are done.   Remove them to a wire rack to cool.

 Serve and Enjoy.

Wednesday, March 7, 2012

A Different Kind of Recipe - All-Purpose Cleaner

Yesterday I scrubbed down our high chairs for the last time.  They are now sparkling and ready to be moved into the garage for donation or craigslist resale sometime in the near future.  My big boys are now eating in their boosters at the kitchen table!  I am so happy to never have to clean those darn chairs again (the boosters are much much easier) and the kids look so grown up!  But of course it is bittersweet as we lose one more vestige of babyhood.  Sigh.  Ok, I'm over it. ;)

Anyway, the big move and my recent success with homemade laundry detergent spurred me to researching how to make non-toxic home cleaners.  Because even though sometimes my good boys use utensils and eat off of plates like this:


Most of the time by the end of the meal the plate has been turned upside down or is on the floor and we are actually eating our fruit like this:

 What cleaning chemicals?  Who cares!  Give me more oranges!

Sooo.  I decided that if they must eat off of the table, I'd rather be cleaning said table with something a bit less toxic the average glass/all purpose cleaner.

In reading around the internets I discovered that there are three basic natural cleaning levels.  Light, medium, and heavy.  Light is generally just something like vinegar and water.  Great on windows covered in child-sized fingerprints but not so great on actually cleaning up food debris.  But I didn't want all the chemicals in the heavy cleaners so this is a more medium type cleaner.   It cleans glass without streaking, cleans up minor food grease and stuff, and it is very low on the non-edible cleaning agents.


All-Purpose Cleaner, found at eartheasy.com
1/2 cup distilled vinegar
2 teaspoons borax (or you can use 1/4 cup baking soda)
2 liters water

I used an empty milk gallon container to mix up my ingredients and store the leftovers of the cleaner in.  Also make sure you have an empty spray bottle.  It is generally advised that you use a new clean bottle rather than mixing this with the unknown chemical residue from an old bottle.  You can buy a nice big spray bottle at Target for $3 or a really cheap smaller one at Walmart for $1.


Pour 2 liters of water into your gallon container using a funnel.  Much less messy that way!  Then pour in your vinegar.


Add the borax or baking soda.  If you are making laundry detergent or have borax around the house I recommend using that to make this a super super cheap homemade product.


Put on the lid and slosh it all around a bit.  Use the funnel to fill up your spray bottle and don't forget to label it!  I also tuck a cleaning rag under the handle to keep it close by and accessible.  Old baby burp rags (those flat fold diapers) work great as cleaning rags and are very inexpensive.


Now obviously this stuff isn't the strongest cleaner out there but I've been using it a while now and I find that as long as I wipe off the majority of the food particles from the table, it does a very good job.  I love not being worried about the babies ingesting chemicals off the tables (most of our tables are glass around here, ugh), I love not worrying about chemicals on my kitchen counters and I love that it even got crayon off the kids Little Tikes plastic table, from which they also eat snacks. On top all that it is easy to make and much much less expensive than the natural cleaners on the market.  I hope you all try it and love it!

A picture to supposedly show my clean table, hard to see that I guess but you can see Taco!

Monday, March 5, 2012

Chocolate Chip Cookies

Move over Toll House, there's a new cookie in town.

Mr Pears requested that I make Thomas Keller's chocolate chip cookies over the weekend.  I took pictures while doing so but told him that this recipe was not going into the blog if the cookies weren't better than Toll House. Toll House chocolate chip cookies are kind of awesome, you know? The gold standard of chocolate chip cookies.

But wouldn't you know it?  Here I am writing a blog post about a chocolate chip cookie that is even better than that classic favorite cookie.  Because Keller's are ridiculously delicious.

Notable differences in the cookies are the use of dark brown (or molasses) sugar, the absence of vanilla extract, and the type of chocolate.  Toll House obviously uses their semi-sweet baking chips.  Mr Keller's recipe uses chopped chocolate bars; half 55% Cocoa, half 70-72% Cocoa.  Which is basically semi-sweet and "dark" chocolate respectively.  

Sounds gourmet right?  Well, yeah, and these cookies look it too.  The chocolate chunks make the cookie look a bit more special and the taste is out of this world even though the chocolate bars honestly don't cost any more than the chips.  Because Toll House is pricey.  I bought a bar of Lindt and one of Ghiradelli from Target for around the same price as a bag of chips.

These cookies are soft and chewy in the middle and buttery and crunchy around the edges which is exactly how I like my chocolate chip cookies.  But here's a tip from the Master (as my husband lovingly refers to Thomas Keller), if you want softer cookies don't under-bake them, mist them with water before baking.  What?  Genius.


Chocolate Chip Cookies; by Thomas Keller, found in ad hoc at home
2 1/2 cups plus 1 tablespoon all-purpose flour
1/4 teaspoon baking soda
1 teaspoon kosher salt
5 oz. 55% chocolate **see note,
5 oz. 70-72% chocolate **see note, cut into chip-sized pieces
1/2 pound (2 sticks) cold unsalted butter cut into cubes
1 cup packed dark brown sugar
3/4 cup granulated sugar
2 large eggs

**Note- I purchased a bar of Lindt and a bar of Ghiradelli as I mentioned above.  The bars were only 3.5 ounces each but my cookies still had plenty of chocolate in them.

Preheat the oven to 350 F.  Line two cookie sheets with parchment paper or Silpats.  Sift the flour and baking soda into a medium bowl and stir in the salt.  Set them aside.

Into the mixer (fitted with the paddle blade) put half of the cubed Cold! butter and beat until smooth.  Add the sugars and the rest of the butter and beat again until smooth and fluffy.

creamed butter and sugar could be the yummiest stuff on the planet

Add the first egg, beat until it is incorporated, then add the other and beat again.  Make sure to scrape down the sides of the bowl if needed.

Mix in the dry ingredients.  I usually add them in thirds and mix slowly until combined.  Lastly mix in the chopped chocolate.


Mr. Keller recommends making these large 3 inch cookies, and I loved them that way.  Use about 2 tablespoons of dough for each cookie.  8 cookies to a tray.  This makes about 30 cookies.


Bake for about 12 minutes.  They are done when the tops are no longer shiny.  Remove the cookies from the oven and let them cool on the tray for about 2 minutes before you move them to wire racks to finish cooling.


This dough freezes very well.  As with most cookies I make, I baked half and then froze the rest.  To freeze, just wrap the dough in plastic wrap and then put it in a freezer bag with the name and baking instructions written on it.


To bake, just thaw the dough in the refrigerator for a few hours. These were so good that I baked the other half only two days later...  :)  They came out just as great.  Enjoy!

Friday, March 2, 2012

Santa Maria-style Tri-Tip

We have entered the Thomas Keller era over here at the 4 Pears household.  We've gone through many "eras"; Gordon Ramsay, Bobby Flay, Ina Garten....  and these periods are almost always caused by the purchase of a new cookbook.

A while back, Father's Day last year actually, Alex received Mr Keller's Bouchon cookbook.  That book brought us a lot of lovely recipes such as the French Onion Soup but also a lot of headaches.  That cookbook is tough!  Not for the faint of heart at all.  So, while we love to suffer through some of those ridiculously complicated recipes, most don't make it onto this blog.  After all, I'm not trying to convince you guys that tearing your hair out over a quiche (darn that quiche!) on a Saturday is a good time.  We are just gluttons for punishment. :)

Our newest cookbook, though, is the one that has spawned our new "era".  Ad Hoc at Home by Thomas Keller is an amazing book!  The recipes are delicious and while not necessarily quick and easy, they are totally doable. Flipping through it I don't see one recipe that doesn't make me hungry.  And on top of appealing dinner, soups, sides and dessert recipes there are sauces and salad dressings,  tapenades and marmalades among many many other things.  This book is packed with how-to's and tips for the home cook.  You could almost just sit down and read it. (Like Mr Pears does some nights)

Last weekend we made one of the easiest Thomas Keller recipes we've tried yet, and it was fabulous.  The Santa Maria-style Tri-Tip.  This cut of meat is reasonably priced at a butcher or Whole Foods and it is super tender. Keller's rub is so so tasty.  Almost fail-proof.  Enjoy!


Santa Maria-Style Tri Tip by Thomas Keller, found in ad hoc at home
(this recipe serves six)
One 2 1/2 lb tri-tip roast  (cook times are for a 3 inch think piece)
1/2 teaspoon freshly ground black pepper
1/2 teaspoon piment d' Espelette (we used crushed red pepper instead)
1 teaspoon sweet paprika
kosher salt
canola oil
1 tablespoon unsalted butter
1 sprig rosemary
1 garlic clove, smashed
1 lemon, sliced thin (about 5 slices needed)

The day before you are having this for lunch or dinner, trim your meat of the silvery skin on top.  Mix together the peppers and paprika and rub them all over the meat.  Wrap the meat in plastic wrap, tightly, and put it into the refrigerator.

Now here's a tip to making an awesome steak that some don't know.  Take the meat out of the refrigerator about 30 minutes before you are going to cook it.  It is perfectly safe to do so and it allows the meat to come to room temperature so that you can cook it properly and evenly.  No cool spots in your medium-rare steak!

Preheat the oven to 300 F.  Heat some oil in a large dutch oven or frying pan on medium heat.  Pat your meat dry with paper towels and season it with kosher salt on all sides.  Put the meat into the pan when the oil begins to shimmer and brown it (without moving it!) for about a minute and a half.  Add the butter, rosemary, lemon slices and garlic clove to the pan.  Flip the meat and cook it on the other side for about 2 more minutes.  Once it is browned, you can either put the dutch oven into the oven or transfer the meat to a roasting pan and put that in the oven.

Roast the meat for 40-60 minutes.  The internal temperature of the center of the meat should be 135 F.  Once it is, take the meat out and let it rest for about 30 minutes so that it retains all of the juices.  Slice and serve!  We had over with an arugula salad and roasted red pepper vinaigrette (recipe also found in ad hoc), it was delicious.  I hope you love it!