Wednesday, October 31, 2012

Happy Halloween!


Happy Halloween!  Here are our masterpieces...Aaron, Alex, and Mommy's.  :)  Aaron and Alex had a blast finger painting their pumpkins and this jolly guy is my first carved pumpkin!  (well at least in the last 20 years)

I hope you all have a Happy Halloween and lots of fun with your kiddos.

PS.  Here are a couple shots of the boys in their costumes at the Springs Preserve Haunted Harvest.  Sorry Alex is so blurry...getting that kid to stand still is next to impossible.  I'm hoping to get a couple of better pictures for posterity tonight while we are trick or treating.  wish me luck.


This post is linked to Artsy Play Wednesday:


Artsy Play Wednesday with Capri +3

Monday, October 29, 2012

Sauerbraten (Sour Beef)

This is one of those recipes that I've been making for a very long time. It is also one of those that I only make in the fall/winter so I always look forward to making it.  Originally, this recipe came from a friends' family but I've adapted it over time mainly due to not having some of the original ingredients local to me any more.  I have no idea if this is even anywhere close to an authentic sauerbraten but it is homey and delicious.  It is tangy from cider vinegar, spicy and slightly sweet from the crushed gingersnaps melted into the sauce.  I love serving this on a cold day with a heaping bed of homemade mashed potatoes underneath.

My thoughts are with my friends and family (and all of you!) out East today as Sandy draws near.  I hope everyone is safe and warm inside with a nice homey dish like this one.

Sour Beef
2 tablespoons canola oil
2 lbs top round, or other stew beef, cut into cubes
1 large onion, chopped
1 cup ketchup
1 cup red wine vinegar
1 1/2 cups apple cider vinegar
pickling spice
gingersnaps (approximately 20)
Salt and pepper

Mashed potatoes
3lb potatoes
2 tablespoons kosher salt
1 1/2 cups milk
1/2 cup (1 stick) butter
Salt and pepper


In a large dutch oven add the canola oil and heat on medium-high.  Once hot, add the beef and onions and cook until the beef is browned.  Season with salt and pepper.


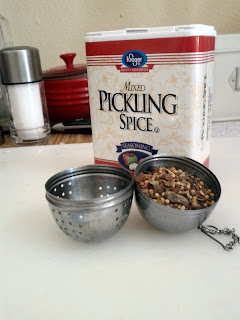
Now pour in enough water to just cover the meat.  Stir in the ketchup and vinegar.  Next I fill a small tea ball with pickling spice and hang it on to the edge of the pot.  If you have no idea what I am talking about, this is what I use.


Let this all simmer for about 45 minutes.  In your food processor, grind the cookies into crumbs.  Transfer the crumbs into a small bowl and add some of the liquid from the beef into the bowl and stir to combine.  Now pour the melted crumbs into the dutch oven and stir to combine.  Simmer for another hour, uncovered.


Meanwhile you can make the mashed potatoes.  These are quick and easy!  Just toss the whole (clean but not peeled) potatoes into a pot of cold water.  Bring it to boil for about 10 minutes or until the potatoes are fork tender. While the potatoes are boiling heat the milk to just under a boil in a small saucepan.

Drain the potatoes.  Remove the skins by rubbing each potato with a clean kitchen towel, they slip right off!  Put the peeled potatoes back into the cooking pot with the butter.  Pour over about half of the hot milk.  Mash the potatoes with a potato masher, add more milk as you think is needed.  Season with salt and pepper.

Put some potatoes in the center of your plate and top with the sour beef.  Enjoy!


Wednesday, October 24, 2012

Play School - Halloween

This week the boys and I are talking about Halloween.  The boys (24 months) don't really understand holidays yet but I am doing my best to introduce them this year.  This will be the first year we take them trick or treating so I am pumping up the whole idea of costumes and trick or treating for candy to get them excited about it.

There are so many great Halloween activity ideas out there that we've had plenty of fun things to do this week, and more to come.

Books:

Five Little Pumpkins - author unknown
Max and Ruby Happy Halloween - Nick Jr
J is for Jack O Lantern - Denise Brennan-Nelson
Boo, Bunny - Kathryn O. Galbraith

Alex really enjoyed the books this week.  Throughout the Max and Ruby book Max yells "Boo" which Alex loves and he thinks all the "eek"s and "squeak"s in Boo, Bunny are absolutely hilarious.

Activities:

Felt jack o lanterns- I cut out two large pumpkin shapes from some orange felt and glued them each to a piece of cardboard along with a green stem.  Next I cut out several different shapes of various sizes to use for facial features.  The boys really liked making faces on the pumpkins, especially Aaron.


The first time we played with these I used them as a story-telling prop for Five Little Pumpkins, we made our felt pumpkin faces match each pumpkin in the book as they spoke.  We talked about shapes and relative size.


Slimy Halloween Sensory Bin - to put this together I boiled two boxes of spaghetti and then mixed vegetable oil and green food coloring into the cooked and drained pasta.  Once it all cooled down completely I put it in a bin with some dollar store Halloween decor and trinkets along with some salad tongs.  The boys had a blast.


Unfortunately, though, I made this up Saturday evening and by Tuesday morning we had a bit of a fuzzy science experiment going on in there....yuck.  So I just (thoroughly cleaned and) tossed the plastic spiders and skeletons and such into our bird seed sensory bin.  The boys always LOVE to play with that one.


Cotton ball Ghosts - This idea came from a super cute project Teresa from Capri +3 shared a few weeks back.  I cut out ghost shapes and the letters for the word "Boo" along with some ghostly facial features and glued them to black construction paper ahead of time.


The boys then pulled the cotton balls into fluff, swabbed on some glue with q-tips and stuck their cotton on to the ghosts.  With much concentration....


Alex liked telling me the letters and the sounds they make


 Aaron insisted on putting more glue on by himself


Once they were done with that (and Alex lost interest)  Aaron glued faces on to each of the ghosts and we hung them up to admire them.  I wish I had a picture of Aaron from when I hung them up, he was squealing and pointing at his masterpiece, it was so cute.


Pin the "nose" on the Jack O Lantern - this is something we picked up in the dollar aisle at Target.  The boys like the jolly looking pumpkin hanging on the patio door and we tried some number recognition when putting on his nose.  Or all five of his noses....


It's been a fun week so far and I am really looking forward to taking the kids to a Halloween event at the Springs Preserve on Friday.  On a side note, if you ever visit Vegas with kids (or just want to see something other than the Strip) this is a great place to go.

I'm also looking forward to having the boys help me decorate some festive Halloween cookies and paint some pumpkins next week.  I hope you all are having lots of Fall fun too!

This post is linked to:

Artsy Play Wednesday with Capri +3

Monday, October 22, 2012

Soup Night

I've mentioned before that we made up some new "rules" to govern our food shopping and menu planning.  The gist is that we are eating local and/or organic whenever possible and having 2-3 vegetarian dinners per week.  The vegetarian meals help us cut down on the grocery bill, because organic meat is expensive, and we believe eating less meat is good for our bodies too.

But now we are adding a new "rule"... Soup night!  We love soup at the 4 Pears house and even though it still isn't out of the 80's here yet, we've got to figure it will get chilly around here sometime soon.  Mr Pears is starting up his Tuesday night soccer league this week so having a Tuesday soup night works out great for us.  Soups can be made up during the day and reheated whenever someone is ready for dinner.  They are also easy to double and freeze to give myself a break from slaving away in the kitchen. ;)

Last week I made a really simple tomato soup with some grilled cheese sandwiches and this week I'm going to try another tomato-based soup, this one with Indian spices and pinto beans.  And soup night isn't complete without some homemade french baguettes.  If you haven't tried these yet, you should!  They are so quick (2 hours start to finish) and easy to make.

Some of my other favorite soups include:

Lobster Bisque - super super easy and really good!
French Onion- time-consuming but totally worth it


Spicy Pumpkin Soup - pumpkin....soup....delicious
Minestrone - a vegetable soup that is anything but bland (but does include some bacon)

image from foodnetwork.com


Visit my Recipe Index page for a few more soup recipes and stay tuned for plenty of new soups this fall/winter!

Friday, October 19, 2012

Ginger Cookies


It just isn't fall without my favorite Ginger cookies so instead of a new post today, I'm reposting this one from last year.

These are my absolute favorite cookies.  They are soft and chewy (even for days after you bake them!) and warm and...fall-tasting...you know what I mean.  I hate to compare them to Ginger Snaps, because that is sort of what they are, only soft...but they are just so much better.

These really are the perfect fall cookie!  Every year I can't wait until October to start making them. We are on  finished batch #2 over here already!  I really hope you try them, and that you love them as much as I do.  There is just nothing better than a really awesome homemade cookie. (By the way this recipe currently has a 5 star rating and 2900! reviews on allrecipes.com....they are obviously amazing, you can't argue with 2900 people!)


Ginger Cookies, adapted from Amy1028 on All Recipes
2 1/4 cup all-purpose flour
1 teaspoon baking soda
2 teaspoons ground ginger
3/4 teaspoon ground cinnamon
1/2 teaspoon ground cloves
1/4 teaspoon salt
3/4 cup butter, softened
1 cup sugar
1 egg
1 tablespoon water
1/4 cup molasses

Preheat the oven to 350 F.  Stir together the flour, baking soda and spices in a small bowl and set it aside.  In your mixer, cream together the butter and sugar.  Mix in the egg, then the water and the molasses.  Slowly mix in the flour on the lowest setting.  Once the dough is incorporated I use a small ice cream scoop to scoop the dough out and on to baking sheets.  If you want to roll the dough into balls by hand, it will feel sticky...no need for extra flour. :)

Bake the cookies for 8-10 minutes then allow them to cool on the sheet for five minutes before removing them to a wire rack to cool completely.   Makes 2 dozen, or so, larger cookies.

Wednesday, October 17, 2012

Play School - Letter A

For our second week of Play School we focused on the letter A.  Now I realize that 24 months is awfully young to try to teach letter recognition but my son Alex is fascinated with letters right now!  He already recognizes about 10 of them, he is always pointing to letters.  We have this Leap Frog Fridge Phonics toy
                                                          
and he has learned letter sounds from playing with it so much.  The kid only says a few actual words but he can tell you what sounds most of the letters make.  I am hoping that practicing those sounds will help him bridge the gap to forming more words.

Here are some of the things we did this week....

Books:
Since this is our first "letter of the week" we focused on books that introduced the alphabet.

Alphabet House by Nancy Elizabeth Wallace
ABC An Amazing Alphabet Book by Dr Seuss
ABC Dinosaurs by the American Museum of Natural History


Activities:

As we go through each of the letters in the alphabet it is my goal to have each boy make their own alphabet book.

For this first page we did "A" is for apple.  I prepared two pieces of brown construction paper for the kids ahead of time.


When we were ready to start I handed each boy a sheet of red paper to tear up into little pieces.  I thought that would be a huge hit with them but they actually had a hard time so I ended up tearing the paper for them.  
Next I "helped" each boy squeeze a bunch of glue around the middle of the apple and let them spread it around with a q tip.  Aaron enjoyed playing with the glue most of all. 


After they spread the glue out they stuck on the red pieces of papers to make a sort of apple collage.


 Aaron had fun with his craft as he almost always does but Alex, also true to form, wasn't all that interested.

Alex was very interested, however, in the next toy I brought out.  Like I mentioned above, Alex loves his fridge phonics and he loves this other Leap Frog toy....


So he enjoyed listening to the letter sounds and searching out different letters on that.  This toy is a little different from most in that the prominent letters are lowercase instead of uppercase.  That is of course a little tough for them at this age but I they did fairly well I thought.

Our last activity was another one I made up ahead of time.  I made laminated mats (using contact paper) with each boys's name on it and gave them each a set of "cards" with the matchingletters to make up their names.  I called out letters to find and they looked for them and put them on their mats.  We've done this one a couple times this week already and they are getting pretty good at recognizing all the letters in their names!


Song Time:

This week we did song time instead of outside time and we (I) of course sang the alphabet song.  These guys love to hear my horrible singing voice so that led to several rousing renditions of Heads, Shoulders, Knees and Toes, and Itzy Bitzy Spider.

Overall, this week wasn't as resounding a success as Week 1.  The boys had a hard time listening to me on Monday so I ended up scrapping "school time" that day and reconvened on Tuesday.  Tuesday went much better.  I am very glad I decided to keep the weeks' materials in a tote box in the living room because we've been able to revisit the items throughout the week when they are interested.  Today I'll have some coloring sheets for them to do when they wake from their nap.

Halloween is up for next week's theme and I've got a lot of fun things lined up some I'm hoping for a great week of playing and learning. :)

 This post is linked to Artsy Play Wednesday, click over for other fun art/play ideas!

Artsy Play Wednesday with Capri +3

Monday, October 15, 2012

Apple Butter

Amazingly, all of the apples that we got at Gilcrease Orchard are gone!  1 apple pie, lots of snacks, and about 6 pints of apple butter later.  Whew.

Besides picking out the boys' pumpkins; apple butter was my main motivation for going to the orchard the other week.  I've never made apple butter before but I've been experimenting with jams and jellies lately and I was hoping to come up with a great recipe for Apple Butter so I could make some for the kids and some to give away at Christmas time.  (We are doing mostly handmade gifts for Christmas this year...more on that later I'm sure.)

When I first started looking for a recipe/method for making apple butter I was a little overwhelmed.  Every recipe I came across was different.  They used different apples, cooked it on the stove or in a crockpot, canned to preserve or just froze the jars.  Some called for peeling the apples, some didn't.  There are a lot of options out there when it comes to apple butter.  I finally settled on this recipe from the blog Serious Eats and made a batch to test it out.   Lo and behold it was great on the first try!  The apple butter was thick and smooth and dark and it tasted just like I remembered.  Slightly spiced and not too sweet....it was very good.

I was so happy with the outcome that two days later I doubled the recipe and made a whole lot more.  That batch I canned for gifts.  It was my first experience with canning and I am really looking forward to learning and doing more in the future.

In the mean time, this is a really good, easy, recipe for apple butter.  You can can it to preserve (keep reading for directions on how I did it) or you can just freeze the jars for up to a year.  The apple butter keeps for about a month in the refrigerator so if you make a single batch as written below, chances are you will eat it up before you need to worry about it going bad.


Apple Butter, adapted from Serious Eats  (makes about 24oz)
4 lbs apples  (I used Granny Smith but from what I've seen around the web you can use just about whatever apples you want, you'll just need to adjust the sugar/lemon juice to taste)
1 cup apple cider
2 cups sugar
2 tablespoons lemon juice
1 teaspoon ground cinnamon
1/4 teaspoon grated nutmeg
1/8 teaspoon ground all spice
1/8 teaspoon ground cloves

Peel and core the apples.  Cut them in half lengthwise and then quarter each half.  Put the apple pieces in a large heavy pot with the apple cider and let it simmer, covered, for about 30 minutes.


By then the apples should be nice and tender.  Puree the apples.  It is best to use a blender to puree the apples because you are looking for a very smooth texture.  Unfortunately our blender died and while we are still searching for the perfect replacement, I had to use my food processor.  Luckily, it did a pretty good job.


Once the apples are pureed you have applesauce!  Dump the applesauce back into your large pot and stir in the remaining ingredients.


Put the pot on low and let it gently simmer for about 2 hours uncovered.  Make sure to stir it occasionally to make sure the bottom doesn't burn.  The applesauce will cook down and become much thicker and darker.

Once it has cooked down to your liking, fill up your storage containers or glass jars if you are canning.

To "can" my apple butter I filled clean 1/2 pint mason jars up to a 1/2 inch from the top.  (You need this "head space" to allow for expansion)  I put on the lids and screwed on the bands.  Then I put my jars into a large stock pot and filled it with enough hot water so that the jars were covered by 1-2 inches of water.  I brought the pot to a rolling boil and then hit the timer for 10 minutes.


The jars boiled, covered, for 10 minutes and then I removed them from the pot with the only canning tool I own so far....a jar lifter.  All that was left then was to let them cool!  As they cool you will hear the pop of the lids which means they are properly sealed.  Check them once the jars are completely cooled to ensure that all of the jars actually sealed.  The middle of the metal lid should feel solid and should not make a popping sound when you push on it.  Click here for some more information on this canning method.  Please note that I didn't use a rack inside my pot as recommended simply because I don't have one...yet.  It is on my wish list right now.  :)

After your jars are cooled you can label them, the ball jars come with cute little labels, and store them until ready to use in the cupboard.  Homemade apple butter all winter, yum!


This post is linked to:
multiples monday with capri +3

Wednesday, October 10, 2012

Play School: Colors (week 1)

Now that my little guys are two I've decided I'd like to introduce a bit of organized "school time" a couple days a week.  My reasoning behind doing this is to give both them and myself some more structure to our days and to begin working on concepts and themes in a fun way along with practicing listening and following directions.

We are just getting started and I'm sure we will adapt and change as we go along but for now this is what we are doing.  Each week I will choose a theme; this first week is colors.  Soon we'll do Halloween for sure.  At the beginning of the week I will put together a tote bin full of the materials we'll be using that week.  Books, games, puzzles, etc.  I'll bring the tote out at our Monday play school time and then it will stay in the living room for the rest of the week for them to explore.  This also works out well for us since most of their toys are kept in the play room upstairs; this tote will give the boys a rotating group of items to play with while they are downstairs too.

We'll probably only do an organized play school session twice a week, Monday and Wednesday.  But knowing we have a theme each week will help me to point out things that go along with our theme even outside that time.  I'm aiming for 30 minutes a session.  10 minutes of storytime, 10 minutes for games/crafts, and 10 minutes for outside/dancing/singing time.  I'm not going to stay too firm with these times.  If they are enjoying a craft or game we'll stick with it for longer, if the activity is a bust we'll move on.  But I do want to try and encourage sitting still for the first two activities as much as I can.

Here is a quick run down of some of the things we've done so far this week while learning about colors.

Books:

Where is the Green Sheep by Mem Fox
My Very First Book of Colors by Eric Carle
Blue Hat, Green Hat by Sandra Boynton
Crayola  Let's Discover Colors (found this in the $1 bin at Target)

Activities:

First up was a color sorting box I made from a jewelry storage box I found at The Container Store for $5.  I just cut out some construction paper squares to fit into the little compartments and used double sided tape to secure them.  I put in some poms and pieces of pipe cleaner for the kids to sort.


Next I brought out some construction paper cards that I covered with contact paper (to keep them from being immediately destroyed).  My intention was to move to a new activity using those but as soon as Aaron saw them he started matching the poms and pipe cleaners to the cards, correctly even!  So we did that for a few minutes. Then I gave the boys six trains that matched the colors of the cards and asked them to drive the trains to the right "sheds".  As you know, my guys love trains so that was a big hit.


Lastly I brought out a puzzle.  When we do this puzzle we usually talk about the shapes but this time I asked them to find the blue piece, red piece, etc.


Outdoor Time:

After the indoor activities wound down we went outside and I shouted out directions regarding the different balls in the back yard.  Like, "kick the blue ball" or "throw me the red ball".  


This was a great activity because the boys were following two part directions and we were all running and playing in the beautiful weather together.  Sorry for the lack of pictures of the boys playing....I was too busy doing my part! :)

Overall I was really pleased with the way the boys listened and attended to what we were talking about and I was sooo impressed with how well they did matching the colors!  The first session really did great and I'm so glad I decided to start doing this.  I think it is going to be a great experience for us all.

This post is linked to Artsy Play Wednesday so if you are looking for even more ideas to entertain your little ones, be sure to click over!

Monday, October 8, 2012

Apple Pie

Living in the Las Vegas desert was quite a change for me, coming from Maryland.  I love the heat and the year-round sunshine but every year around fall I get nostalgic and wish for pumpkin patches and Christmas tree farms. (But not for snow or ice.)  I always worried about what I would do with my children to celebrate fall and winter in a climate where there is no snow and it is still 90 degrees in October.

Amazingly, this year I found an orchard here in Vegas.  Las Vegas is something of an onion.  Everyone knows all about the Strip but there really is more to this town than that, you just have to peel back a few layers to find it.  This orchard is about 40 minutes from our house and they operate year round. (since 1920, it's been here all along and I didn't know!) People can come and pick a variety of different row and tree crops depending upon what is in season.


Right now there are apples and pears, sweet potatoes, pumpkins, eggplant and okra among others.  They make and sell apple cider and apple cider donuts too.


We had a great time tromping down rows picking apples and scouring the pumpkin patch for our favorites to bring home.  The kids had a great time and I know we'll be back...and not just in October for pumpkins.


We had a great experience, and we bought a ton of apples.  Way too many apples, it was too hard to resist them! We plan on canning apple butter and apple sauce and yesterday I made an apple pie.  I'm sure there will be other apple desserts as well.

But for now, if you are looking to make a traditional style two-crust apple pie, this is a great recipe.  I decided to use 4 Jonagold and 3 Granny Smith apples to give it some variety in flavor and I thought it was delicious.

I also used a different recipe for the crust, I used this one by Ina Garten instead.  This is literally one of the very first times I made a pie crust that I was actually happy with and I think it was all about method.  Instead of making the dough with your hands you use the food processor to pulse everything together.


After you add the water and the dough starts to form a ball you just turn it out onto a piece of plastic wrap and smoosh it together into a disk, wrap it and refrigerate it for at least half an hour.


My dough was easy to work with it didn't crumble or crack and it tasted so good!  I'll be using this recipe as my go-to for now on. :)

Here's a few pics of the pie...yum!


This post is linked to Multiples Monday, click over to check out with other families with multiples are up to!


multiples monday with capri +3