Monday, September 26, 2011

Monday Monday

Whew.  Things are quite busy around the 4 Pears house.  My sister left us on Tuesday after a great visit.  She and I enjoyed our girl time down on the Strip and the boys loved seeing their Auntie.  We are all going to miss her when she moves back East!

But on Wednesday Alex's parents arrived!  The boys are having a lot of fun with their Grammy and Grampy, especially considering all the birthday gifts they brought along. :)  The kitchen is still a very busy place but we haven't really been making anything new and exciting.  Instead we've been enjoying some of our favorites.

Thursday was Roast Chicken, we really enjoyed the nice juicy bird with some maple roasted butternut squash. On Friday we broke out the deep fryer and made Fish and Chips with Jalapeno Poppers to start. Then Saturday night we brined pork chops, and Sunday we had Bloody Mary Salads.  Throw in some Oatmeal Pancakes and a Peanut Butter Cheesecake and you can bet we are all happy and no one is going hungry around here. Tonight we are going out to eat...with the twins.  It is bound to be an adventure.

I've been doing a terrible job taking pictures of all the fun times around here but I did get our professional pictures back a few days ago!  Here's a few shots of the 4 Pears family.   Have a great week everyone!


Friday, September 23, 2011

Turkey Meatball Stroganoff

As some of you may have noticed, my favorite cook book for the kids is by far Start Fresh by Tyler Florence (and you can get it in The Pantry!)  It is full of kid-friendly recipes that are healthy and above all, flavorful.  You won't find any bland baby food in this book.

It is my supreme belief that we have to teach our children to eat, just like we teach them to put themselves to sleep, walk, talk and read.  And teaching requires effort.  By making an effort to introduce as many foods and flavors as possible, as early as possible, we are giving our children the building blocks for making good nutrition choices for the rest of their lives.

If you and your baby are just starting out on the journey into solid foods Start Fresh has a ton of recipes for purees.  Flavor combos like spinach and banana, parsnip fig and pear, or carrot and mango.  Tyler also teaches parents how to get the most flavor from foods.  You won't have much need of a steamer basket using this book.

If your baby is a bit older, like mine are, you'll be sure to find recipes the whole family will love.  I think the biggest, and only, real downside to this book is the lack of recipes that target finger feeders.  I don't know about everyone else but my little guys weren't ready to wield a fork and spoon by the time they were interested in self-feeding. We are going to start working on that soon but for now finger foods rule in my house.  Though Tyler doesn't dedicate a section to that "art" of eating, some of his recipes can be eaten with fingers and we've yet to come across one the babies didn't like.  I like that this is a book that took us from baby to toddler and on with interesting recipes to keep us trying new things and new flavors.  A great buy if you are in the market.

A few weeks ago we tried yet another recipe from this book.   The kids enjoyed it, and had mushrooms for the first time!  (They loved them.)  This is a great meal for the whole family.  The turkey meatballs are moist and easy for babies without molars to enjoy and it incorporates every kids' favorite food, pasta.  I hope you enjoy it.

Turkey Meatloaf Stroganoff, adapted from Tyler Florence- found in Start Fresh
1 slice multigrain bread
1 1/2 lbs ground turkey
2 tablespoons whole milk
1/2 medium onion, diced
1 teaspoon caraway seeds, crushed
salt
2 tablespoons olive oil
1 clove garlic, minced
6 ounces white mushrooms, sliced
1 sprig thyme
2 tablespoon all-purpose flour
2 1/2 cups chicken stock
1/4 cup sour cream
1 tablespoon dijon mustard
8 oz cooked egg noodles
2 tablespoons chopped parsley

Tear up the bread and put it in a large mixing bowl with the turkey, milk, caraway seeds, onion and a bit of salt.  Mix all of it together with your hands to combine.  Shape the mixture into 1 1/2 inch meatballs.  This makes about 18.  (plenty of leftovers for the kids to eat the next day!)

Heat the olive oil in a large skillet over medium heat.  When the oil begins to shimmer add the meatballs and brown them.  Remove them to a baking tray and finish cooking them in the oven, 20 minutes at 350 F.

While the meatballs cook, cook the pasta and begin the sauce.  For the sauce add the garlic to the skillet you cooked the meatballs in.  Cook the garlic for about a minute and then add the mushrooms and the thyme.  Cook them 2-3 minutes or until golden and then sprinkle the flour over the mushrooms and stir them around to coat.  Add the chicken stock and cook until the stock has thickened, about 10-12 minutes.

Once it the sauce is thick, whisk in the sour cream and the mustard.  Keep on warm until the meatballs are done. Once they are put them into the sauce and turn to coat.  Serve the meatballs and sauce over the pasta and top with the parsley.
Aaron concentrating on eating
And feeding Claire too, of course

Thursday, September 22, 2011

Don't hate the Sprouts!

Seems like just about everyone out there hates brussels sprouts.  But why?  And when was the last time these haters actually tasted a brussels sprout?  This is my challenge.  Before you say you hate brussels sprouts again, try this recipe.  Because even though everyone "hates" a sprout....everyone loves bacon.

Bacon is indeed the key to this dish.  Instead of just plain old bacon (which is great too!) spring for the seasoned kind.  Whole Foods carries a few different ones., we bought 4 strips of ancho chili and garlic bacon.  The seasoning along with the bacon fat (yum) made our sprouts super tasty.

We served the kicked up sprouts with a rib-eye and potato gratin

Spicy Bacon Brussel Sprouts, courtesy of 4 Pears
4 strips of spicy seasoned bacon
1 lb brussel sprouts
1 tablespoons unsalted butter
salt and pepper to taste

To begin, put the bacon in a heavy cold pan.  Turn the heat to medium and cook until crisp.  Once cooked move the bacon to a plate covered in paper towels to drain off excess fat and to cool. Once cool, crumble the bacon into small pieces.

To prepare the brussels sprouts, trim off the stems and the outer yellowed leaves of each sprout and cut them all in half.  Put them in a colander and rinse them well.

Put the cleaned sprouts into the pan you used to cook the bacon.  Add the butter and cook the sprouts for about 10 minutes over medium heat.  Next, add the crumbled bacon.  Taste the sprouts and season with salt and pepper if necessary then cook them for one minute longer. Remove the sprouts to a bowl to serve.

Wednesday, September 21, 2011

Schnitzel Biscuits?

Weird name, great sandwich.

We watched Food Network Star for the first time this past season (#7) and we were excited when Jeff Mauro won. (Though we were rooting for Vic Vegas too, of course)  Jeff dubbed himself the "Sandwich King" and I was happy that Food Network picked him for a show.  I mean, who doesn't love a good sandwich?

Sometimes it seems like when you are at home a sandwich need consist only of bland sandwich bread, lunch meat and cheese.  Blah.  But why not make a restaurant quality sandwich at home?  Sure its a little more (ok, a lot more) effort...but according to Jeff you can make "any meal a sandwich and any sandwich a meal", and a meal deserves a little more effort.

Now that his show is running (though I admit we still haven't seen it...must set DVR) we decided to try and make one of Jeff Mauro's sandwiches.  After perusing the short list on Food Network we went with the Schnitzel Biscuits.  Apparently schnitzel is Austrian for thinly pounded, fried, meat...yum.  Add a biscuit and some braised cabbage and you have one very lovely sandwich.


There are four elements to this sandwich but none are particularly difficult or time consuming and the sandwich really comes together in the end.  **Bonus** if you aren't making 8 sandwiches you'll have left over biscuits for breakfast the next day!  In fact, if you aren't interested in making the entire sandwich, just the recipe for the biscuits alone is worth keeping.  They were simple, easy and delicious.  The cabbage was amazing too and would be great with pork chops.  But really, try the sandwich.

Schnitzel Biscuits, adapted from Jeff Mauro
Pork
3 tablespoons salt
1 tablespoon sugar
1 pork tenderloin, silver skin removed, about 1 1/2 lbs
black pepper
1 cup all-purpose flour
2 eggs, beaten
2 cups Panko breadcrumbs
3 tablespoons vegetable oil, for frying
Biscuits
4 cups self-rising flour (see easy substitution here)
1 stick butter, plus 3 more tablespoons melted
1 tablespoon vegetable oil
Cider-Braised Cabbage
2 tablespoons butter
1 tablespoon caraway seeds
3/4 cup apple cider
2 tablespoons apple cider vinegar
salt and pepper
Raspberry Mayo
1 cup mayonnaise
1 tablespoon lemon juice
1 tablespoon raspberry preserves
1/2 teaspoon lemon zest
pepper

To begin you'll brine the pork tenderloin.  Mix the salt and sugar with 6 cups of ice cold water until everything has dissolved.  Pour the liquid into a gallon sized ziplock bag and then put in the pork.  Put the bag in a large bowl and then place the bowl into the refrigerator for at least an hour.

Next you can make the mayo.  Just mix all the ingredients together in a small bowl, cover it with plastic and put it into the refrigerator as well.

Time for the biscuits.  Preheat the oven to 425 F and place a large cast iron skillet inside so that it preheats as well.  Cut the butter into the flour in a large bowl, work quickly until the mixture is very crumbly.   Add in the buttermilk very slowly (I only needed 2 cups) until the dough forms and but is still fairly moist.   Turn the dough onto a floured surface and roll it into a ball with your hands and then press it out until it is about 1 inch thick.  No rolling pin needed, woo hoo!  Now using a drinking glass or a biscuit cutter, cut out 8 biscuits about 3 inches in diameter.

Take the hot skillet out of the preheated oven and carefully add the vegetable oil to it.  Put in the biscuits, touching each other, then brush the tops with the melted butter.  Put the skillet back in the oven to bake about 15 minutes.  They should be nice and golden brown when they are done.

Oops I made nine!


Meanwhile start the cabbage.  Heat a large heavy pan, like a dutch oven, over medium heat.  Melt the butter and then add the caraway seeds and cook them until fragrant, only about a minute.  Add the cabbage to the pot a bit at a time to wilt it.   Once it is all in, add the cider and vinegar and let simmer for 15 minutes.  I kept my pot covered for most of that time.  Once the cabbage is soft, season it with salt and pepper and put it on low while you are finishing up.

Lastly, the pork.  Remove the pork from the brine and dry it with paper towel.  Cut it into eight 1 inch rounds and then pound each to about 1/4 inch thickness.  Season with salt and pepper.  For your batter put the flour onto one plate, the beaten eggs another, and the panko on a third.  Put a wire rack over a baking sheet to set the pork on once battered.  Coat each slice of pork in each dish in turn and set on the rack.

Heat the oil in a large pan on medium heat.  Once the oil is hot fry each slice of pork for about 3 to 4 minutes per side.

Put some of the mayo on your freshly baked biscuits along with a slice of pork or two and some of the cabbage.  Serve more cabbage on the side, it is good stuff!  Enjoy!

Tuesday, September 20, 2011

How-To Tuesday! Simple Substitutions

Sorry I'm a little late posting this...I've been having too much fun with my sister!  But better late than never right?Because I really do think this stuff is helpful.  So many times I think people are turned away from cooking because the ingredients are too complicated.  It is so much nicer to be able to cook with what you have on hand rather than running to the store to buy something you know you aren't going to use again any time soon.  I find myself turning to these substitutions often and I appreciate them for making my life easier and for making complicated recipes more simple.

Some simple substitutions that I use on a regular basis:

Buttermilk-  The real thing is amazing and worth buying if you are going to use it, but if you find a great recipe and all you are lacking is buttermilk this works great too.  Add 1 tablespoon of white vinegar to one cup of milk.  (whole milk is best but others work too)  Stir it in the allow the milk to rest for 5-10 minutes.  Give it another quick stir and add it to your recipe.

Self-rising flour- I keep white whole wheat, all-purpose and cake flours in the house at all times.  For me, three types of flour is more than enough.  If I need self-rising flour I add 1 1/2 teaspoons of baking powder and 1/2 teaspoon of salt to all-purpose flour.  Works like a charm!

Bread flour- Again, this just isn't flour I buy...but I do like to make bread a lot.  Instead of buying more flour I keep a box of vital wheat gluten.  Add 1 teaspoon to a cup of all-purpose flour to make your own bread flour.  The wheat gluten lasts a long time and the little box takes up much less space than a 5lb bag of bread flour.

Chocolate- When baking you'll find recipes that call for unsweetened, sweetened, bittersweet, semi-sweet.....chocolate.  That's a lot of chocolate to keep on hand so most of the time I stick to buying unsweetened chocolate only and I sweeten it myself to suit whichever is called for in the recipe.

**1/2 cup Sweet chocolate - melt 4 oz of unsweetened chocolate (usually 1 square is 1 oz) with 1/3 cup       sugar in a small pan set over another pan of simmering water. (double boiler)

**1/2 cup Semi-sweet chocolate- use the same process as above but only 4 tablespoons of sugar with 4 oz of chocolate.  Bittersweet and semi-sweet can be used interchangeably.

Heavy Cream- for 1 cup use 3/4 cup whole milk and 1/3 cup butter.

Half and Half- for 1 cup use almost a cup of whole milk (about 7/8 cup) and 1 tablespoon of butter

Lemon juice- use 1/2 teaspoon of vinegar to replace 1 teaspoon of lemon juice if necessary.

There really are a ton of these so when in doubt, Google it!  Don't set aside a yummy looking recipe just because you are lacking one item. Happy Cooking!

Monday, September 19, 2011

The weekend is over for most people, but mine is still in full swing!  My sister is in town visiting so we are living it up while my amazing husband watches over the kiddos. Thanks honey!  I'll try to make sure the partying doesn't get in the way of this weeks great recipes. ;)

How-To Tuesday- Simple Substitutions.  I used to come across so many recipes that looked great except it included something I didn't have.  Or something I just didn't want to have to buy.  As time went on I found that many times a very easy substitution may be all that is needed to make that recipe much more doable.  Hopefully this list will open up a whole new array of possibilities for your culinary adventures.

Wednesday- Shnitzel Biscuits.  I know, schnitzel what?  Did you watch Food Network Star season 7?  Alex and I really loved the "Sandwich King" Jeff Mauro so we tried one of his recipes on Friday, it was awesome!  Lots of great elements you can use in the sandwich and in other ways.

Thursday- Brussel Sprouts.  First snitzel then sprouts?  Yes.  I think sprouts are one of the most under-rated veggies out there.  I'm going to share how I use a little bacon and butter to spice up these unloved little sprouts and I know you'll love them...if you'll just give them a shot!

Friday- Swedish Meatballs.  This is a very toddler friendly recipe I got from Tyler Florence's Start Smart cookbook (available in The Pantry!)  Flavorful turkey meatballs in a nice creamy sauce over noodles.  This was the twins' first introduction to mushrooms and they loved them.  A great dish for the whole family.

So that's it!  Here are some pictures of my lovies to brighten your Monday.

Daddy Alex with Baby Alex
Smiley Aaron enjoying the "cool" weather (only in the 90's!)


Friday, September 16, 2011

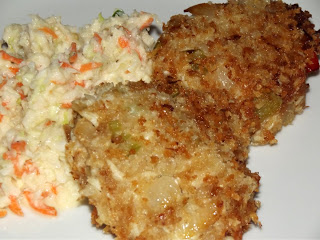
Crab Cakes

I'm originally from Maryland and Maryland is, of course, known for Blue Crabs.  Growing up I spent plenty of time sitting around picnic tables covered in newspaper, up to my elbows in Old Bay seasoning and crab shells. Picking crabs is a lot of work and I usually left the table hungry.  It's really more of a social thing than an eating thing.  At least for me.  If I'm really hungry for crabs, I'd rather a nice crab cake.

I really like these crab cakes because they have the nice sweet flavor of the peppers and onions, a hint of Old Bay, and most of all- because they are crunchy. Instead of using regular bread crumbs I've swapped them out for Panko.  The panko give the cakes a bit of crunch and keep them from being the least bit oily from frying.  These cakes are nice and light, not oily and dense.  Very delicious.


Crab Cakes, adapted from Emeril Lagasse
2 tablespoons olive oil
1/2 cup diced celery
1/2 cup diced red peppers
1/2 cup diced green peppers
salt and pepper
1 tablespoon chopped garlic
1 pound lump crab meat
1/2 cup chopped green onions
1/2 cup mayonnaise
1/2 teaspoon Worcestershire sauce
1/2 teaspoon hot sauce
1 1/2 cups Panko, divided
1/4 cup all-purpose flour
1 tablespoon Old Bay seasoning
1 egg
2 1/2 cups vegetable oil, for frying

Heat the olive oil in a large pan over medium heat.  Saute the onions, celery and peppers with a bit of salt and pepper for about 5 minutes.  Add the garlic and gook for 2 minutes more.  Remove from heat and set aside to cool for a few minutes.

Place the mayo in a large bowl and stir in the Worcestershire sauce and hot sauce.  Add in the crab meat, veggies and 3/4 cup of the Panko.  Mix to combine.

On a small plate mix the flour with 1/2 tablespoon of Old Bay.  In a small bowl slightly beat the egg with about a tablespoon of water.  On a second plate, put the rest of the Panko.

Heat the vegetable oil in a large pan to 360 F.

Make the crab mixture into patties (about 1/3 cup filling each).  Dredge them in the flour, then dip them into the egg wash, and then cover them in panko.

Fry the cakes in the hot oil for about 4 minutes per side.  Place on a try covered with paper towels to drain excess oil.

Thursday, September 15, 2011

Chocolate Peanut Butter Cheesecake

I hadn't made a cheesecake in a looonnngg time.  They just seem too decadent and complicated for a weekend dessert that will only be eaten by my husband and I.  For some reason though, I was feeling generous towards said husband last weekend.  His favorite dessert combo is chocolate and peanut butter so I was searching for a good recipe he'd be sure to love.  I stumbled upon this cheesecake and figured why not give it a go.

Although I've admitted here before that I'm no baking pro, this came out great!  The chocolate topping is to die for and the filling is just the right level of peanut butter.  It isn't too heavy and rich either, as some cheesecakes can be.

I'd say this is a keeper.  Looks beautiful, tastes great and I didn't mess it up! :)


Chocolate Peanut Butter Cheesecake, adapted from Nigella Lawson
crust
2 cups graham cracker crumbs (about 7 oz of whole crackers)
1/2 cup salted peanuts
1/2 cup bittersweet chocolate (chips or roughly chopped)
4 tablespoons unsalted butter, softened
filling
2 (8 oz) bars cream cheese, room temperature
3 eggs, room temperature
3 egg yolks, room temperature
1 cup superfine sugar
1/2 cup sour cream
1 cup peanut butter, room temperature (if you keep yours in the fridge!)
topping
1 cup sour cream
1 cup milk chocolate (chips or rough chopped)
2 tablespoons light brown sugar

Preheat the oven to 325 F.  Put the ingredients for the crust into the food processor and pulse until it forms crumbles.  Turn it out into a 9 inch spring form pan and and press the crumbs into the bottom and up the sides.  Place the pan into the refrigerator to help harden it while you are making the filling.

In the mixer, using the paddle attachment, place all ingredients for the filling and mix until smooth.  Pour the filling into the crust and put it into the oven to bake for about 1 hour.  You should start checking on the cake at about 45 minutes in....when the top looks fully cooked, take it out.

Now in a small saucepan melt the milk chocolate with the sour cream and brown sugar over low heating, whisking to combine.  When it is, pour it carefully over the cake and then spread it out evenly with a rubber spatula.  Put it back into the oven for 10 more minutes.

Once done cool completely,  In my opinion, this cheesecake should be refrigerated before serving as well.  This is a great dessert to make the day before a get together.

Enjoy!

Wednesday, September 14, 2011

Fig Cereal Bars

So in my never-ending quest to find new and interesting (homemade!) foods for my growing boys, I started looking for a fruit cereal bar I could make.  I wanted something healthy I could feed them at snack time.  They love their muffins, but variety is the spice of life!

Fruit is a tough one here since Aaron is still breaking out in a small rash whenever he eats any kind of berry (or tomatoes).  Since melons are still available they've been eating a ton of them.  They have bananas all the time for breakfast and apples fairly regularly too.  I was very happy to find a great cereal bar recipe that included figs, a new fruit!

I found this recipe at an interesting blog I decided to start following.  It's called Eat, Live, Run.  (Three things I  enjoy myself!)  The recipe posted is actually vegan and though I have nothing against eating vegan, I un-veganed it.  My only reason was to avoid having to buy ingredients I just don't have on hand.  If you want, feel free to click through and go vegan instead!

These bars are like large whole wheat fig newtons.  They are not as sweet as the popular cookies, but I thought they were just sweet enough. I made them on Sunday and they are still nice and soft and delicious.  The boys have really seemed to enjoy nomming on them for snack.

(They ate every crumb of those big bars, my little piggies!)


Soft Baked Fig Cereal Bars, adapted from Eat, Live, Run
3 oz unsalted butter
1/2 cup + 2 tablespoons brown sugar
2 eggs
2 tablespoons milk
3 cups white whole wheat flour
1 teaspoon baking powder
1/2 teaspoon baking soda
1/2 teaspoon salt
1/2 teaspoon cinnamon
2 cups dried figs
1/4 cup sugar
2 teaspoons vanilla extract
1 1/2 cups apple juice
1 1/2 cups water

In your mixer with the paddle attachment, cream together the brown sugar and butter until it is nice and fluffy. Add in the eggs one at a time, mixing to incorporate after each addition.  With the mixer on low, add in the milk.

Combine the flour, baking powder and soda, salt and cinnamon in a separate bowl.  Slowly add the flour mixture to the butter mixture to combine.  Once a soft dough forms, remove the dough and shape it into a smooth ball.  Wrap it in plastic and allow it to chill in the refrigerator for at least a half an hour.

Now work on the filling.  Put your dried figs into a large saucepan with the juice, water and sugar.  Bring the pot to a boil and then reduce the heat and allow it to simmer for 30 minutes.  After 30 minutes turn off the heat and let the figs and liquid cool down.  Once cool pour the contents of the pot into your food processor, add the vanilla, and process until you have a nice smooth fig spread.  This stuff is pretty yummy alone!

Once the filling is complete, remove half of the dough from the refrigerator.  (Leave the other half in to stay cool!) On a floured surface roll out the dough in a long rectangular shape.  Mine was about 18 inched long and about 4 inches wide.  Spread the filling onto the dough leaving a one inch edge around all sides.  Now roll out the second half of dough to the same size, lay it over the filling and press the edges together to seal.  Cut your rectangle into about 10 cereal bars.  Place the bars onto a parchment paper lined baking sheet and bake them in an oven preheat to 350 F for 25 minutes.


I hope you and your kiddos enjoy them!

Tuesday, September 13, 2011

How-To Tuesday! Bechamel Sauce

There are generally believed to be five "Mother" sauces of French cooking.  These sauces serve as the base for all other sauces. So if you can learn to make these sauces, you can make any sauce!   

The five "Mother" sauces are:
1. Bechamel - a white cream sauce made from butter, flour and milk
2. Veloute - a white sauce made with butter, flour and chicken, veal or fish stock
3. Espagnole - a brown sauce made with butter, flour, tomato paste, veggies and meat stock
4. Hollandaise - a rich yellow sauce made of egg yolks, butter and lemon juice.  
5. Tomato- you guessed it, a red sauce made from tomatoes.

Hopefully I'll get to covering each of them on the blog sometime.  I happen to be in love with Eggs Benedict so Hollandaise is a must.  But for now there is Bechamel.

Bechamel Sauce, from Mario Batali
5 tablespoons unsalted butter
4 tablespoons all-purpose flour
4 cups milk
2 teaspoons salt
1/2 teaspoon freshly grated nutmeg**

**If you own a microplane buy whole nutmeg, it is so yummy and it is really easy to grate it fresh since it is stored in a glass spice container and keeps for a long time**

To begin, heat the milk in a small saucepan over medium-low heat.  You want the milk to get hot but you don't want it to boil!  Keep a close eye on it. When the milk is starting to feel warm to the touch melt your butter in a large saucepan on medium-low heat. 

Milk heating in the back, butter melting in the front.

Once the butter is melted, turn the heat up to medium and add the flour.  Stir constantly and cook for about 6 to 7 minutes.  The mixture will be a nice golden color.


Now add the hot milk to the butter/flour one cup at a time. Whisk constantly to incorporate it all before adding more milk.  Once all the milk has been added and the sauce is smooth, bring it to a boil...carefully!  Stir it constantly and adjust the heat down if needed so that it doesn't boil over.


Let it boil for about 10 minutes until the sauce is thickened, again stirring constantly.  Remove it from the heat and stir in the nutmeg and salt.  

May not look like much but it is delicious!  Bechamel Sauce is the perfect sauce to use in homemade macaroni and cheese.

Macaroni and Cheese, courtesy of 4 Pears
1 lb cooked elbows
1 lb grated cheese (get creative!  I made an "adult" mac and cheese on Sunday using half mild cheddar and half spicy buffalo wing cheddar)
bechamel sauce from above
20 crushed Ritz crackers, divided
2 tablespoons butter
salt and pepper

Preheat the oven to 350 F. After draining your elbows put the pasta back into the large pot you cooked them in.  Pour over the bechamel sauce, stir in two thirds of the cheese and half of the cracker crumbs.  Pour the pasta into a greased casserole dish and top with the rest of the cheese and then the crackers crumbs.  Dot the top with butter.  Finish with a little salt and a lot of freshly ground pepper.  Bake for 20-30 minutes or until the top is golden and the cheese is melted.

Before it went into the oven

Sorry there is no "after" picture.  Alex and I literally dug into the dish as soon as it was out of the oven. :P

Monday, September 12, 2011

What's Cooking?

Did everyone have a wonderful weekend?  I hope so. :)   We spent a rather quiet weekend around the house, lots of cooking...and eating. Yum.

This is what our kitchen looked like at around 12:30 yesterday afternoon

If you look at this picture closely you'll see three large piles of cheese, butter, three pots on the cook top,  an open canister of flour and a cutting board full of diced veggies down at the end of the frame.  Our kitchen got a workout this weekend.

From the huge list of things that came out of that kitchen this weekend; this week on the blog I'll be sharing these....

Tuesday- This week's how-to is Bechamel sauce. Bechamel is one of the "mother" sauces.  It's a white sauce that you can use as the base for other sauces or as is in a million different recipes.  I used it yesterday in some baked macaroni and cheese.

Wednesday- Fig Cereal Bars.  I made these on Sunday for the first time and they were a huge success! This is a great cross between a Nutrigrain bar and a Fig Newton.  A perfect toddler (or grown-up) snack.  The twins LOVED them.

Thursday- Chocolate Peanut Butter Cheesecake.  Need I say more?  ;)

Friday- Crab Cakes.  There are a billion different recipes for crab cakes and since I'm originally from Maryland I've had one of each it seems.  I'll share my favorite recipe on Friday.

Hope to see you back, happy Monday!

Friday, September 9, 2011

Your NEW favorite cake

The Black Walnut cake is a Brown Family tradition.  My grandmother made it for us all the time...and still does when I make it back east for a visit. It was the cake we always requested for birthdays, even the kids!  It was just that good.

Since I don't have Grandma's recipe (she is a dash of this, sprinkle of that kind of cook) I baked up my own version based on Ina Garten's honey vanilla pound cake.  Her cake is pretty darn awesome just the way it is, but the black walnut version?  It's definitely my new favorite.  (Don't tell Grandma)

This cake is so good!  You really need to try it.  Because, really?  Words don't do it justice.  Black Walnuts don't taste like the regular English walnuts most people are used to eating.  They are better.  And in this recipe you use Black Walnut extract and crush your actual black walnuts so you aren't chomping on large hunks of nuts.  This is a great cake for a simple dessert with ice cream and it is also a great breakfast type cake.  Sweet, but not too sweet.  Just delicious.

I think the cat wants some too

Black Walnut Cake, adapted from Ina Garten's honey vanilla pound cake
1/2 cup unsalted butter at cool room temperature (leave it out for about an hour)
1 1/2 cups sugar
4 extra-large eggs, at room temperature
2 teaspoons black walnut extract
2 cups cake flour
1 teaspoon kosher salt
1/2 teaspoon baking powder
1/2 cup black walnuts, crushed
for the glaze:
1 tablespoon lemon juice
1/2 cup powdered sugar

Preheat your oven to 350 F.  Grease the bottom of a 9 inch loaf pan with butter and then coat it with flour.

In your mixer, using the paddle attachment, cream together the butter and sugar until it is nice and fluffy.  That will take about 3-4 minutes on medium speed.  Next add the eggs one at a time, incorporating each one before adding the next.  Once they are all incorporated add the extract.  Combine the flour, salt and baking powder in a small bowl before adding that to the mixer as well, a little at a time, on low speed.  When that is done remove the bowl from the mixer and fold in the crushed walnuts.

Pour the batter into the prepared pan and bake it for about 50-60 minutes.  A toothpick inserted in the middle should come out clean.

Allow it to cool for 15 minutes before turning it out of the pan.  Let it cool completely on a wire rack.  Once cool mix together the lemon juice and powdered sugar and then pour it over the cake in a back and forth pattern across the top.  Serve and enjoy!


Thursday, September 8, 2011

Jalapeno Poppers

I probably haven't had a jalapeno popper in years.  You may not have noticed but we (mostly Alex) have a vendetta against prepared foods here in the 4 Pears household.  So when my husband suggested we have jalapeno poppers with our pizza the other night, I was pretty sure he didn't mean the kind that came out of the box in the freezer section.

Who makes homemade jalapeno poppers?  This girl.  They were awesome and actually quite easy.  The peppers had a bit of a crunch and the creamy filling was delicious.  I may have thought he was crazy, but they came out great and we'll definitely be making them again soon.

Jalapeno Poppers, adapted from Emeril Lagasse
8 large fresh jalapeno peppers
4 ounces of cream cheese, softened
1/2 cup pepper jack (or another spicy) cheese
1/4 teaspoon of Essence (Emeril's spice blend, you can buy it in the grocery store or make it yourself)
1/2 cup all-purpose flour plus 3 tablespoons, divided
1/2 cup milk
1 large egg
1 1/2 cups panko bread crumbs (the panko makes these crispy so I wouldn't recommend substituting the regular stuff)

First prepare the filling by mixing the cheeses together in a small bowl.  Set aside.

Next work on cleaning the peppers.  You might want to wear some rubber gloves for this!  If not your hands will be covered in the spicy oils from the peppers and it is hard to get off!!  With a paring knife make a T in each pepper cutting under the stem (but not cutting it off) and then down the length of the pepper.  This creates a nice pocket.

Remove as much of the seeds and ribs as you would like.  I removed most of the seeds and ribs and my pepper were still pretty spicy.  Now stuff the filling into the pocket and squeeze to close them back up.


Heat a deep fryer or pot of vegetable oil to 370 F.  If you are using a pot you'll need to fill it about 1/3 of the way.  

While it is heating make up your batter and breading.  First mix 1/2 cup of flour with the milk and the egg.  Then on a plate combine the 3 tablespoons of flour, the panko and the Essence.

Dip each of the peppers into the batter then carefully coat them with the breading.  Once the oil is ready slide them in (in two batches so you don't crowd them) and fry for 2 minutes.  Remove them from the oil to a plate lined with paper towels and salt them.  Dig in!

Wednesday, September 7, 2011

Oatmeal Pancakes

The boys eat pancakes just about every day.  They LOVE pancakes.  Between the two of them, most days they eat 3 pancakes and a whole banana for breakfast.  And God forbid Mama doesn't get them onto the trays fast enough, watch out!

When they aren't eating pancakes with veggies in them, they are eating oatmeal pancakes.  These pancakes are almost completely oatmeal.  Two cups of old fashioned oats to just 1/2 cup of flour.  Even so, they are nowhere close to being bland like plain oatmeal.  The buttermilk and melted butter in the batter make these pancakes so so good.  Alex and I love them just as much as the kids do.  This is definitely my favorite pancake recipe. A warning though: these do take some advanced planning. The batter needs to be made at least two hours before you can actually fry up the cakes.  This is necessary in order soften the oatmeal.  I make the batter the night before so it is ready to go first thing in the morning.


Buttermilk Oatmeal Pancakes, adapted from Bon Appetit, August 1999
2 cups old fashioned OR quick-cooking oats
1/2 cup all-purpose flour
3 tablespoons sugar
1 teaspoon baking soda
1 teaspoon baking powder
1/2 teaspoon salt
2 1/2 cups buttermilk**
2 large eggs
1/4 cup butter, melted
1 teaspoon vanilla extract
additional butter for frying

**if you don't have buttermilk, add 1 tablespoon of vinegar for each cup of milk called for in your recipe.  Stir them together and let sit for 5-10 minutes.

Mix the dry ingredients together in a large bowl.  Beat eggs slightly and add them, the buttermilk and the vanilla and mix the batter together.  Once the melted butter is slightly cooled, stir that in as well.  The batter will seem very runny, don't worry.  The batter has to sit at least 2 hours so the oats can soften.  I make this the night before, cover the bowl with plastic wrap and just give it a stir before frying up the pancakes in the morning.  By then the batter will be much thicker.  Spoon it on to a hot buttered frying pan or griddle.  Flip the cakes when they begin to bubble and seem cooked on the edges.

Tip!  As I've said in the past...if you want to make a bunch and freeze them, let them cool completely then put them on a parchment paper-lined baking try in a chest freezer for about an hour.  Once frozen you can put them into freezer bags without any danger of them sticking together.  If you don't have a freezer drawer or chest you can stack them with squares of parchment paper in between each cake.


Tuesday, September 6, 2011

How-To Tuesday! Pizza Dough

Pizza is one of my favorite things to eat.  Like I said yesterday, it is right up there with Cheeseburgers.  But, for me, there is a big difference between good pizza and bad pizza. I'm not a big fan of delivery pizza and frozen pizzas are pretty bad too.  When I lived in Maryland my favorite was Ledo's.  Its a franchise now but my family has been going there since the original opened in 1955- and growing up we ate Ledo's a lot.  Out here in Las Vegas I like Grimaldi's.  They make coal-fired pizza and the toppings are delicious.  But even though a new Grimaldi's just opened up a few minutes from us, we probably won't be eating there anytime soon.  We just don't take the kids out to restaurants very often yet.  We are such wimps. :P

Instead, to calm my pizza cravings, I learned to make pizza dough!  Sure you can buy it at a lot of grocery stores now, but making it from scratch is really easy and very economical.  Pretty tasty too.

Pizza Dough, adapted from Gordon Ramsay Makes It Easy
(makes 2 large pizza crusts)
2 teaspoons active dry yeast
1 cup warm water
4 cups bread flour **
1 Tablespoon olive oil

**If you don't want to by bread flour like me, you can buy wheat gluten to add to all-purpose flour.  Whole Foods sells it.

In a small bowl add the yeast to the warm water.  Stir it in and let it set for about 10 minutes.  You can make this dough in a stand mixer with the dough hook or in a food processor with the dough blade.  Put your flour and the olive oil into either and then turn it on low and add the yeast/water to it as well.  Mix or process until the dough leaves the sides of the bowl and sticks together.  It should be nice and smooth when it is done.  Add a little water or flour as needed to get the right texture.  Once it is done put the dough in an oiled glass bowl, cover it with plastic wrap and allow it to double in size. It shouldn't take more than an hour.

Split the finished dough in half and either freeze the dough or roll it out on a floured surface to the desired size and shape.  I usually make one large pizza and  freeze the other half of the dough for another day.


Find the perfect sauce (I like this one) and the perfect toppings to make your pizza!  For me, good toppings are just as important as good crust and good sauce.  All three parts are essential to a really good pizza. My favorite toppings are sausage, onions, and fresh tomatoes.  Looks and tastes amazing.  ENJOY!

My masterpiece before it went into the oven.

Monday, September 5, 2011

Weekend Recap, and a Look Ahead

Our weekend isn't quite over yet thanks to Labor Day, but it's been great so far. Friday was our five year wedding anniversary!  Instead of going to a fine-dining restaurant and having a night out on the town, as may have befitted such a special day, we opted for a very low-key evening at our favorite local Mexican restaurant.  Bad service and great food as usual.  :) We enjoyed a margarita or two, gambled some money away in the local casino, and just relaxed for a few hours while the babysitter came over and kept an ear on the baby monitor for us.

Saturday we had some professional photos taken of the whole family at a park close by to our home.  I'm really excited to see them, I hope they turned out great!  That evening we made homemade pizza and jalapeno poppers for dinner.  Yes, homemade poppers!  They were awesome!  And so was the pizza.  Pizza is right up there with cheeseburgers in my book.

Sunday I got a new camera, so no pictures today. I have a manual to read!  I'm looking forward to taking some better pictures of the kids and maybe the food pictures will get a little better too.  Photography is something I really need to work on.

Here's what we are sharing with you this week:

Tuesday: Pizza!  Pizza crust, pizza sauce.... both are super simple basics that you can combine with your favorite toppings to make pizza and movie night even better.

Wednesday: Oatmeal Pancakes.  The twins aren't using utensils yet, and the only things they will eat off a spoon I'm in control of is yogurt and applesauce. They used to love oatmeal but then they met pancakes and that love affair has not yet ended.  They love these, but surprisingly they really love oatmeal pancakes too... and so do Mom and Dad. :)

Thursday: Jalapeno Poppers.  Yum.  These are NOTHING like the ones you buy frozen.  They are sooo much better.  Spicy peppers and a creamy filling, this is one awesome appetizer.

Friday:  Black Walnut Cake.  Most kids love chocolate cake growing up, but those kids never had my Grandma's Black Walnut Cake.  Whether you like nuts or not, this cake is worth trying.  I've never met anyone who didn't love it.

Alright, seems like a good week to come.  Since I don't have any pictures I'll leave you with this video.  Baby laughter can't be beat.  (PS. AJ is the one laughing but I call the poor kid Squirm all the time.)

Friday, September 2, 2011

Challah

I've never been very good at making French Toast.  It always came out too eggy tasting...or maybe not eggy enough.  It was always just mediocre and nothing to write home about.  And then I discovered this:


Challah.  A rich bread, eggy and dense, somewhat sweet and very delicious. Perfect for making french toast.

Although I was a bit afraid of making bread without the aid of my trusty bread machine, when I saw this recipe a while back on a blog I follow, think liz, I decided to go for it.  It came out perfectly the first time, and every time since.  It truly is an easy bread to make as long as you are sticking around the house for a few hours.  It may be easy, but it isn't quick.  Luckily it really is worth the time.

Challah Bread, adapted from Joan Nathan via think liz
3/4 tablespoon of active dry yeast
1 1/2 tsp plus 1/4 cup sugar
1/4 cup olive or vegetable oil
3 eggs
1 1/2 teaspoons of salt
4 cups all-purpose flour

In the bowl of your mixer, stir your yeast and sugar into 3/4 cup of lukewarm water.  Using the whisk attachment whisk in the oil, 2 eggs (one at a time), and the rest of the sugar and salt.  Switch the whisk attachment out for the dough hook and gradually add the flour mixing at a medium-low speed until the dough comes together.  Turn the speed up to medium to "knead" the dough until it is smooth.

Put the dough into a large glass bowl that has been lightly rubbed with oil and cover it with plastic wrap.  Let the dough rise in a warm area for about an hour or until it has doubled in size.  Once doubled, punch the dough down, recover it, and then allow it to rise once again for about 30 minutes.

After the time is up turn the dough out of the bowl and divide it into 3 equal balls.  Roll each ball out to about  12 inches long.  Pinch the tops of the strands together and then braid them.  When you get to the ends, tuck them under the loaf.

Put the braided dough onto an oiled baking sheet and brush the top with the remaining beaten egg.   Let the dough rise on the sheet for one more hour.  After the rise, brush the dough with the egg once more before putting it into an oven preheated to 375 F.

Bake for 30 to 40 minutes or until the top is nice and golden brown.  Cool on a wire rack before slicing.
Enjoy your french toast! :)

Thursday, September 1, 2011

Grilling for Labor Day

Is it against the law in the United States to NOT grill out on Labor Day?  Kind of feels like it. Labor Day is a holiday for enjoying the last bit of summer, and Summer = Grilling.  So grill something!  Can I suggest burgers?

I am a HUGE fan of burgers.  I ate vegetarian for three years while in my 20's and it was the craving for cheeseburgers that finally made me give it up.
Yummy.

Burgers are the go-to grilling item but they don't need to be boring or bland. When most of us want to make up some burgers we  head to the meat section at the grocery store and grab some ground beef.  80/20 makes a good burger....grass-fed beef is pretty great...but the best burger we've made came from ground brisket.  Upon Tyler Florence's advice, Alex and I tossed 2 lbs of beef brisket, cut into chunks, into the meat grinder.  What?  You don't have a meat grinder?  Shocking.  Well, in that case, ask the butcher to grind it for you.  Most grocery stores will; they definitely will at Whole Foods.   And believe me, its worth asking for.  A little ground brisket, some salt and pepper, and a few awesome toppings and you will have yourself an amazing burger to celebrate Labor Day.

Cheese Burgers, adapted from Tyler Florence
2 pounds beef brisket, ground
kosher salt and freshly ground pepper
4 slices of Swiss Cheese (or any other favorite cheese!)
1 large sweet onion, sliced
1 tablespoon butter
1 large tomato

Before you start on the burgers, get your toppings ready.  Slice the tomato and season the slices with salt and pepper and set them aside.  It is amazing what a little salt and pepper do to a tomato.  Now to caramelize the onions.  In a large frying pan melt the butter over medium heat.  Add the onions to the pan and allow them to cook very slowly, about 20 minutes. They will be soft and golden brown and incredibly sweet!

Once the onions are almost done fire up the grill.  Season the ground meat with salt and pepper and mix them in with your hands.  Now form the meat into 4 patties.  To keep them flat on top while they are cooking, create an indentation in the middle of each patty.   Put the burgers on the hot grill and cook for about 5 minutes per side for medium.  About a minute before they are done, top them with cheese.

Make sure to put your finished burgers on great tasting buns and top them with a slice of tomato and some of the onions.  I like a bit of mayo on my burger too. :)  The addition of the ripe seasoned tomato and the sweet onions to a very juicy burger is unbelievably good.  So enjoy it!  And enjoy the long weekend.